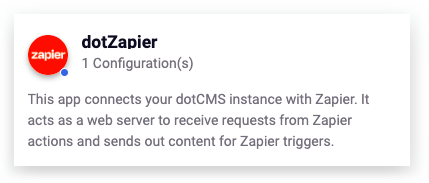
The dotZapier plugin simplifies integration with a wide assortment of third-party web applications through Zapier.
At the time of writing, Zapier facilitates integrations with more than 6,000 applications. Once this plugin is installed, you'll be able to take advantage of this to send information to or from dotCMS to any of these.
To use this plugin, you'll need two things:
- dotCMS Enterprise Edition, as this plugin has both Workflow and App components, both of which are Enterprise only;
- An account with Zapier through which you'll build simple configurations — called Zaps — that specify the details of the interaction.
Building, Deploying, and Configuring the Plugin
You can find the plugin's source at its GitHub repository; clone it, and then run gradlew jar to build the JAR file under com.dotcms.dotzapier-plugin/build/libs.
Upload the file via DevTools → Plugins. Once it's active, head to System → Apps to configure it.

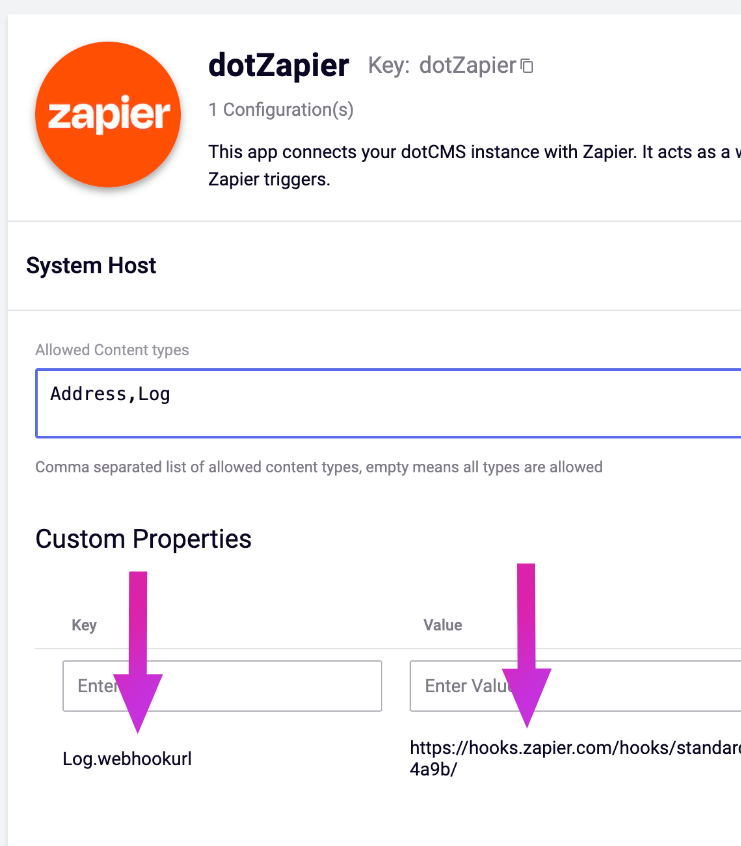
As with any App, determine whether you're configuring the dotZapier plugin for a single site or the System Host — i.e., all sites. Within the appropriate pane, you can replace *, which selects all Content Types, with a comma-separated list of Content Type variables.
Send to Zapier Workflow Sub-Action
By installing the plugin, a new “Send to Zapier” Workflow Sub-Action becomes available. Add this to any Workflow action to create a trigger for a Zapier interaction from the dotCMS end.
After adding this to a Workflow Action, you can click it to add additional configuration, via three fields:
| Field | Description |
|---|---|
| Zap Webhook URL | Overrides the webhook for this Zap; can be left blank in most cases. |
| Post-Script Code | Additional Velocity scripting to customize the output. |
| Field Value Customization | Performs transformations over all data fields in the contentlet before sending. Note: This does not affect the stored values of the contentlet afterward. |
Post-Script Code
The Post-Script Code field allows you to manually adjust content in the course of being transmitted to Zapier. Use the $content variable to refer to the contentlet being acted upon — e.g., $content.title.
Examples of this field in action can be found at the bottom of this article.
Field Value Customization
The Field Value Customization performs the same operation over the whole set of fields in a contentlet. This is useful for across-the-board transformations or formatting adjustments to content.
This field uses the following variables:
| Variable | Description |
|---|---|
$contentlet | The entire contentlet being acted upon. |
$fieldVarName | The name of a given field. |
$fieldValue | The value of a given field. |
$contentMap | Similar to $contentlet, but a full, heavier-weight content map used elsewhere in Velocity contexts — opening up a wider array of functions, such as .toHtml(), etc. |
Finally, using $dotJSON.put(variable, data) will executes a given operation. For example, $dotJSON.put('fieldValue', "${fieldValue}xyz") will append xyz to the end of all fields being transmitted.
Example Setup: Connecting to Google Sheets
Initial dotCMS Configuration
The following section will guide you through the process of integrating dotCMS with Google Sheets. This assumes the plugin is installed, at minimum; please see above for more on installation.
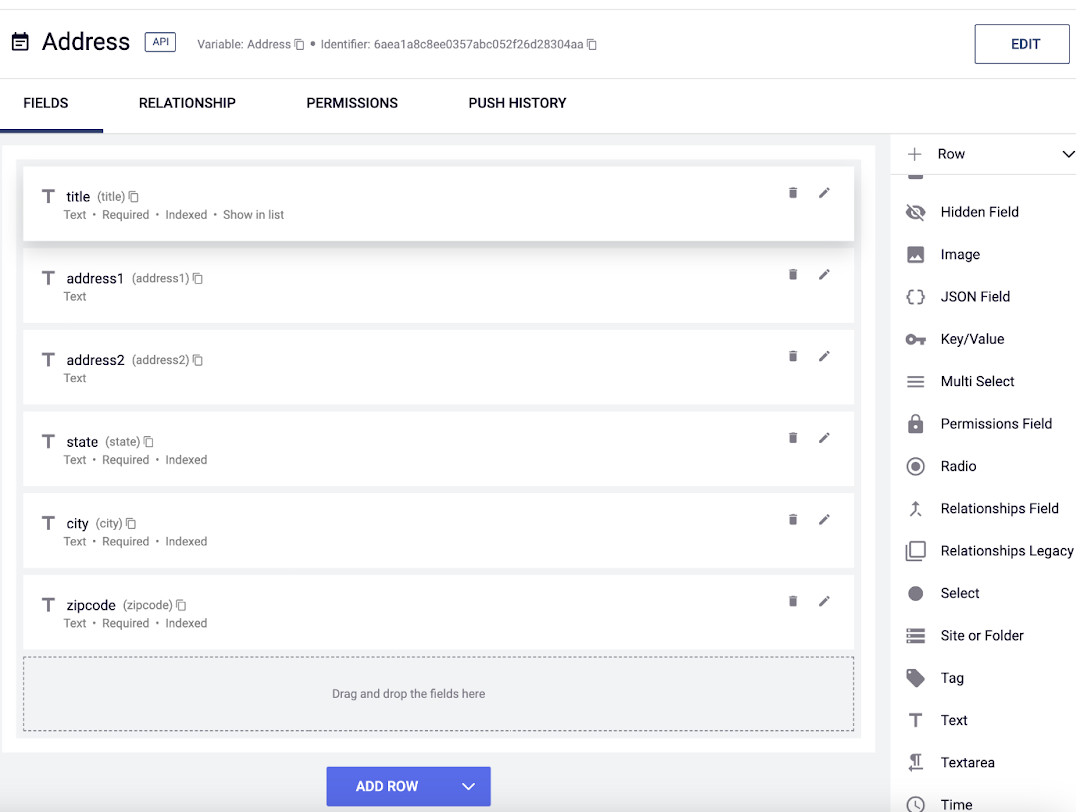
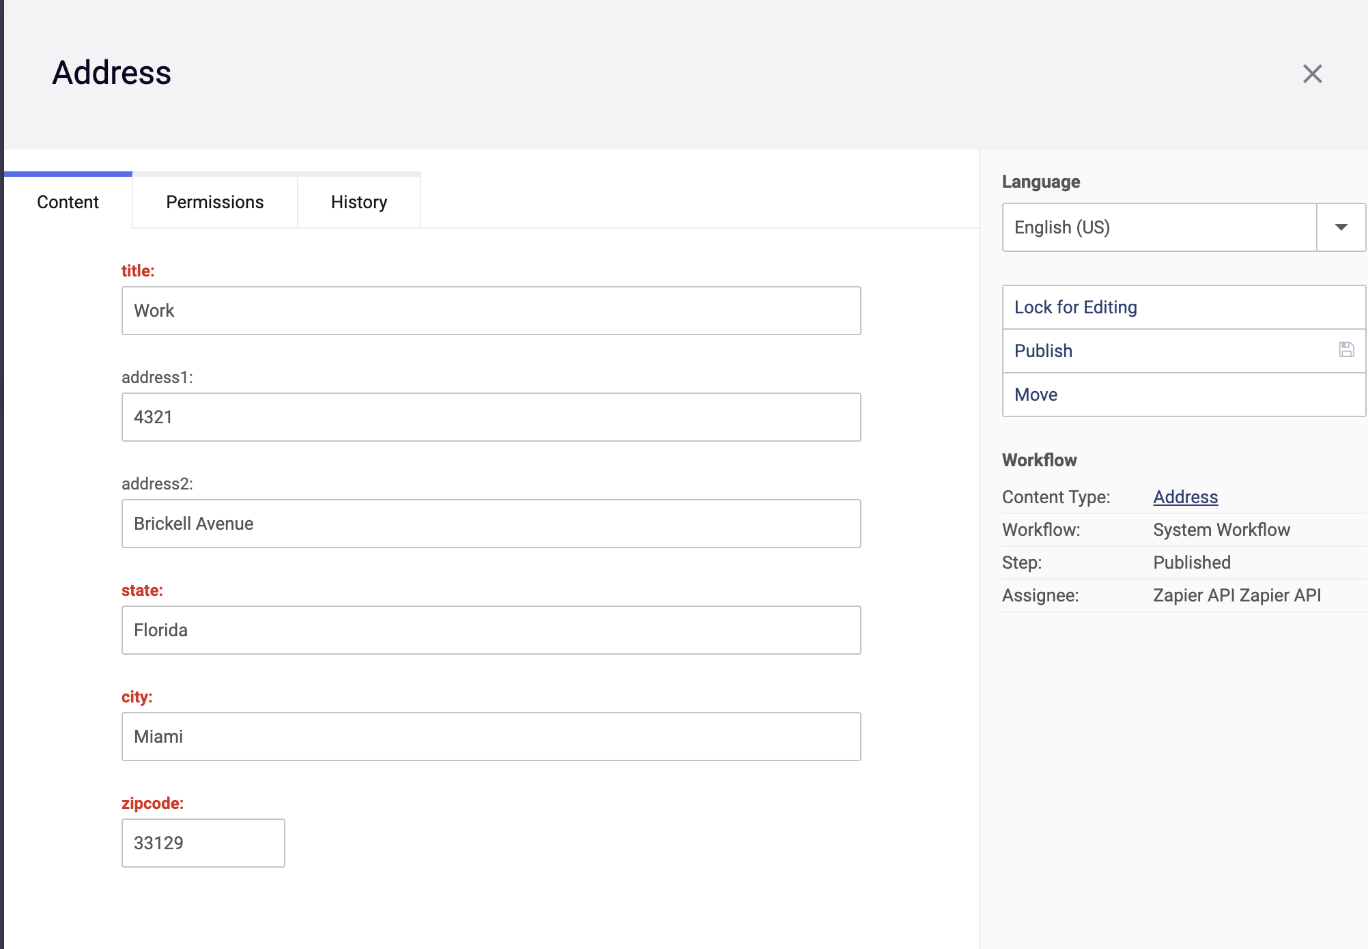
We'll begin by creating a Content Type to serve as a dummy. We'll name it Address, and it will consist of six Text fields named title, address1, address2, state, city, and zipcode.
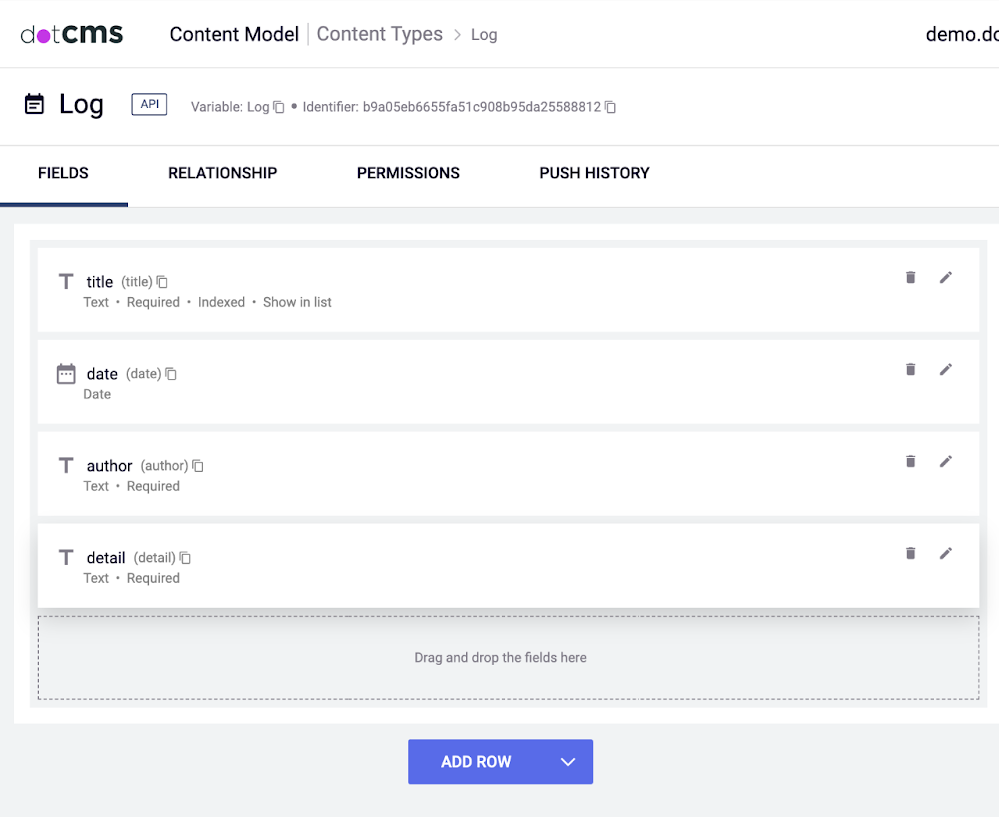
Next, we'll create a second Content Type: Log, consisting of a title Text field, a Date field named date, and two more text fields named author and detail.
For the sake of simplicity, both types will use the System workflow. However, you can attribute any workflow you prefer to them. Similarly, the exact field configurations of the dummy Content Types are completely up to you; everything in this section is for demonstration purposes.
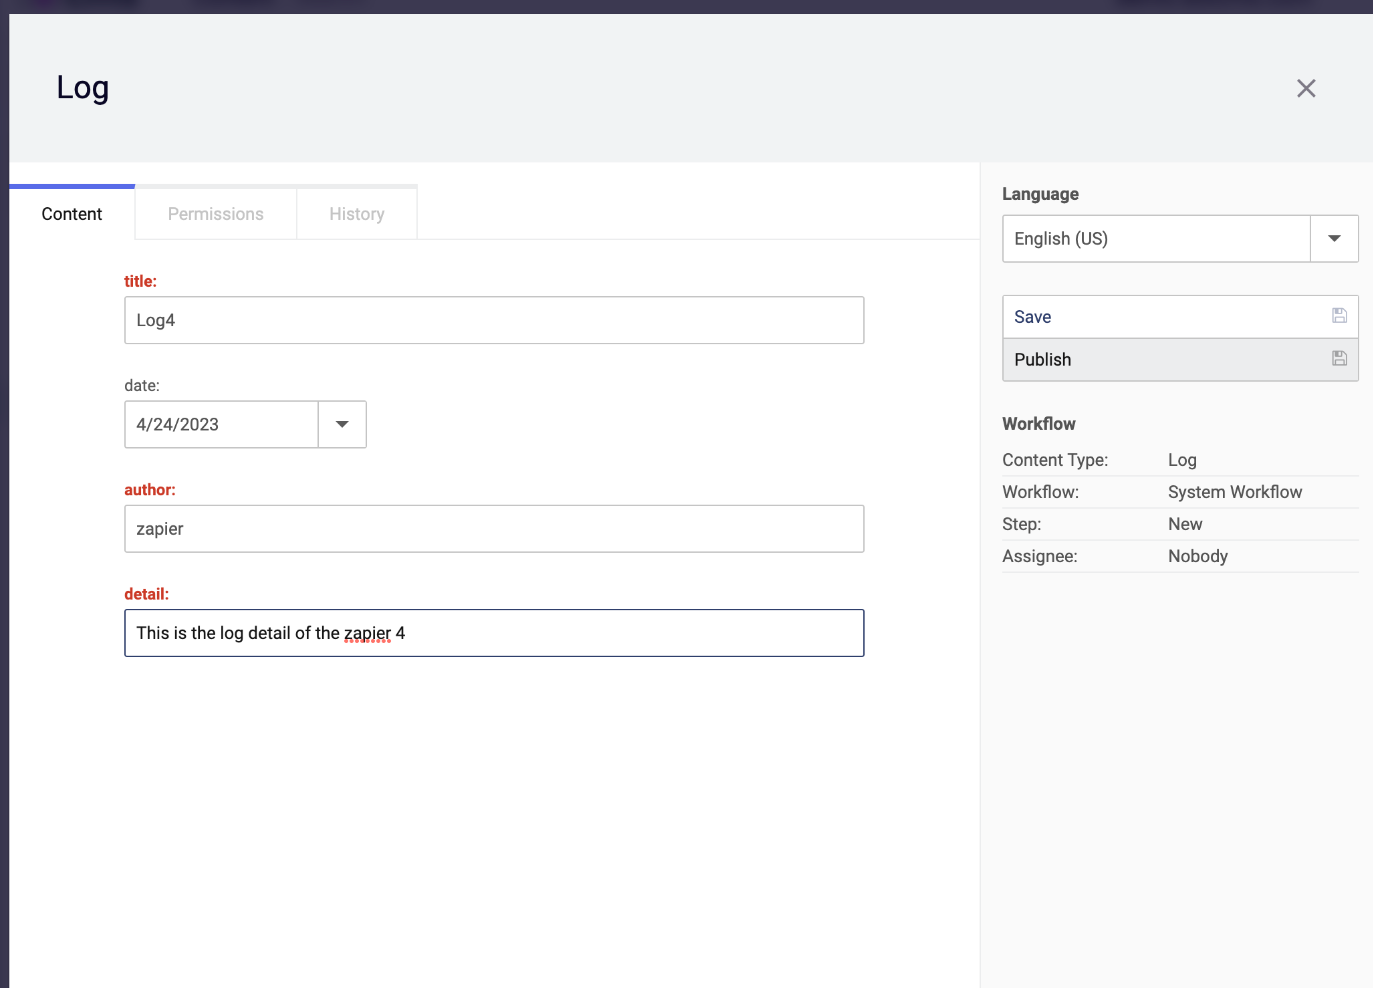
This is a good time to make one or two contentlets of each of the two Content Types, so you'll have test material ready.
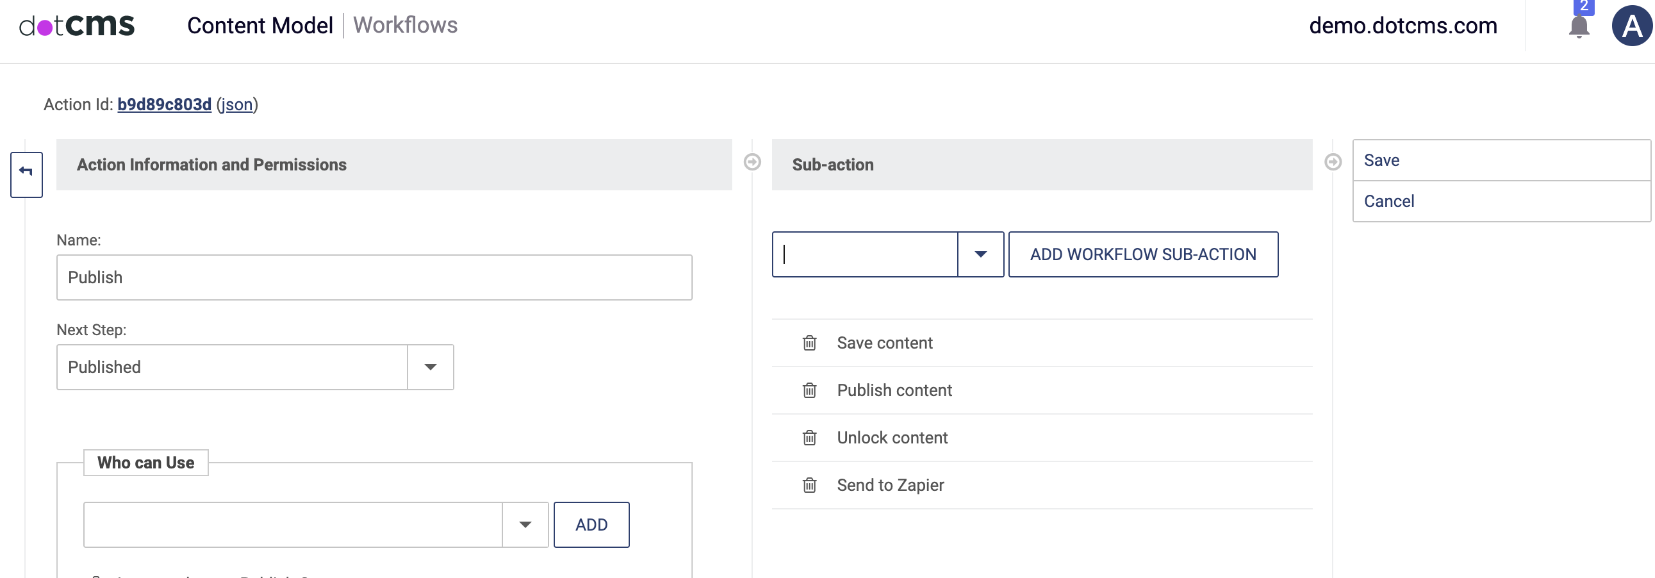
On the System Workflow, we'll add the Send to Zapier sub-action to the Publish action, as seen below:
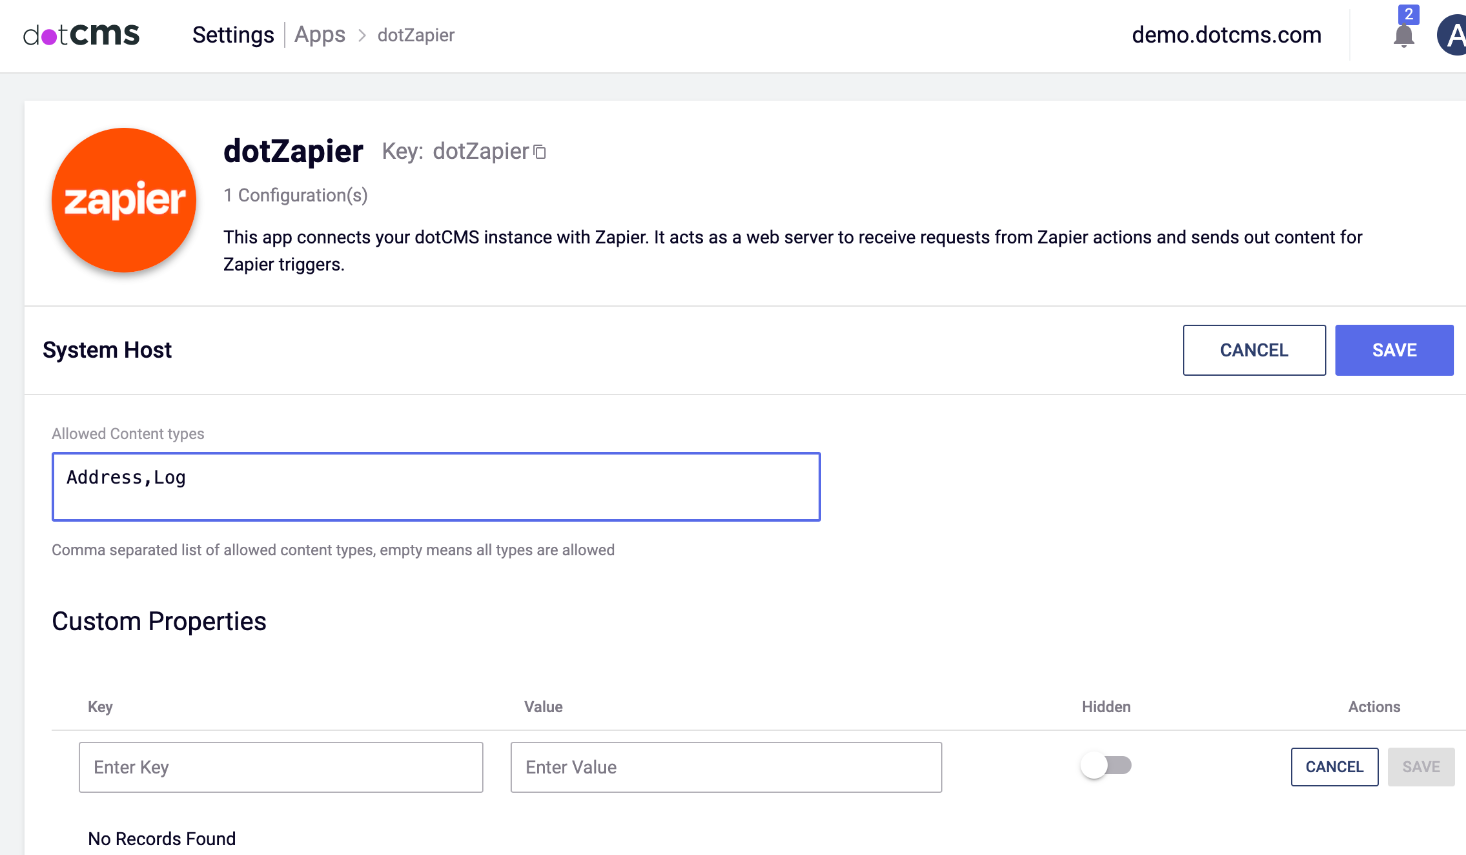
As shown in the previous section, we'll jump over to App config and ensure that the dotZapier App is configured to target the two content types we created, setting its Allowed Content Types to Address,Log. Now, when using the Publish action, only those two Content Types will trigger the Send to Zapier sub-action; all others will be skipped.
That's all on the dotCMS side for the moment. The next stage of configuration occurs in Zapier.
Zapier Configuration
Create a Zap; search for, and select, the dotCMS application as its trigger.
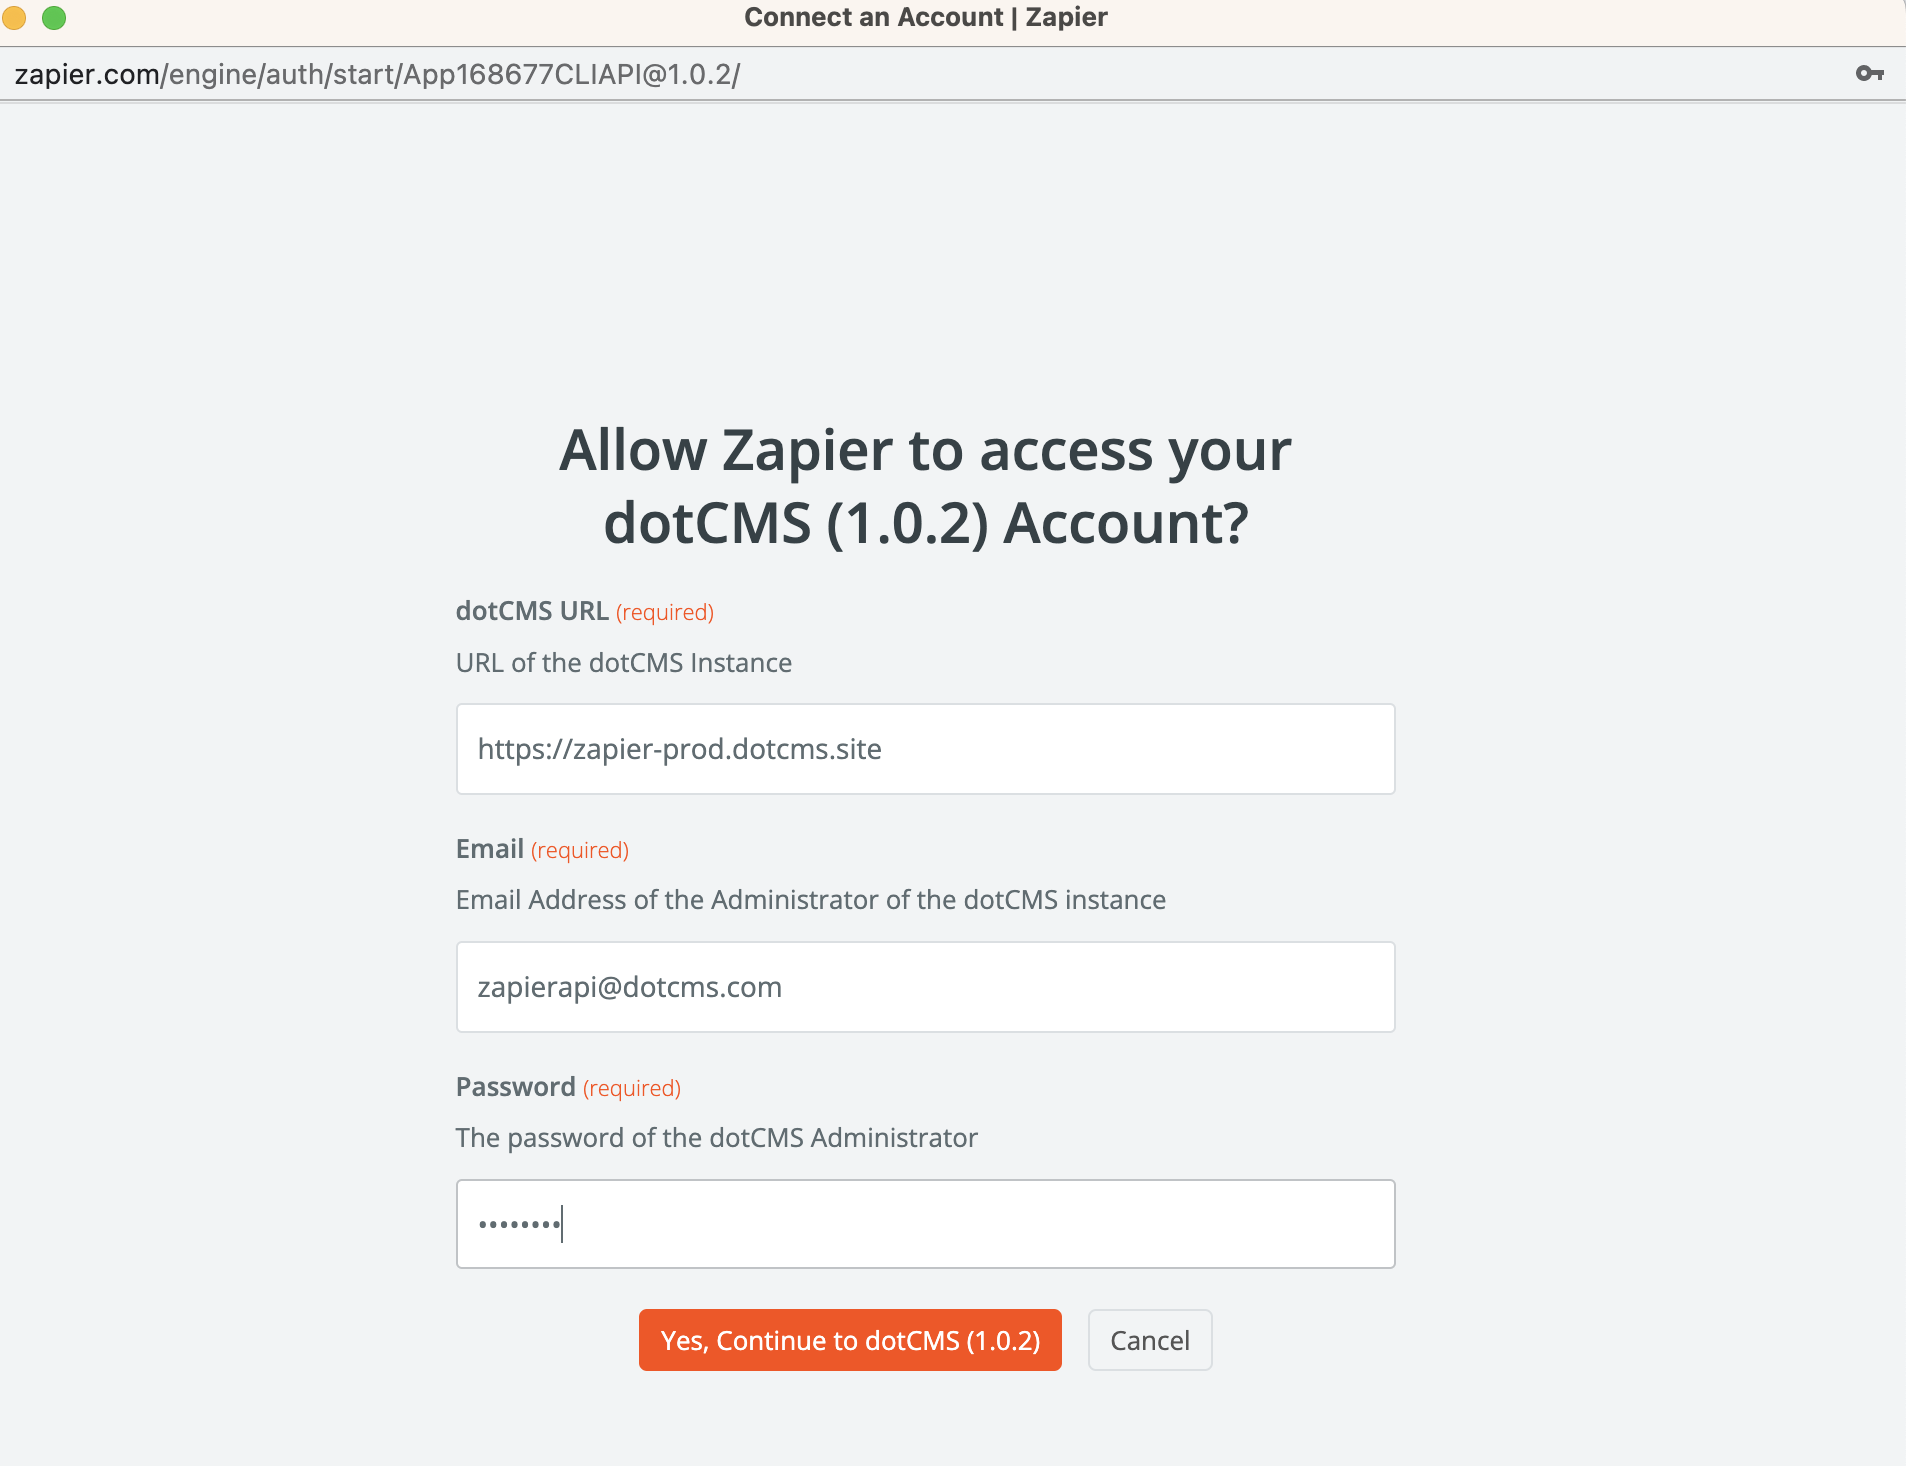
You'll be prompted to select a user. You may need to select + Connect a new account at this time. Provide the root URL of your dotCMS instance, and the email address and password of the dotCMS account that will be associated with the dotZapier plugin use — that is, allowing Zapier to sign in as that account. It is strongly recommended that you create a unique account for this, to better limit permissions to the relevant content types or workflow actions according to use case.
Next, you'll be prompted to set the event trigger that will determine when Zapier receives information from dotCMS. This means selecting the relevant Content Type. If everything was configured properly, only your two “dummy” content types should show up on the list.
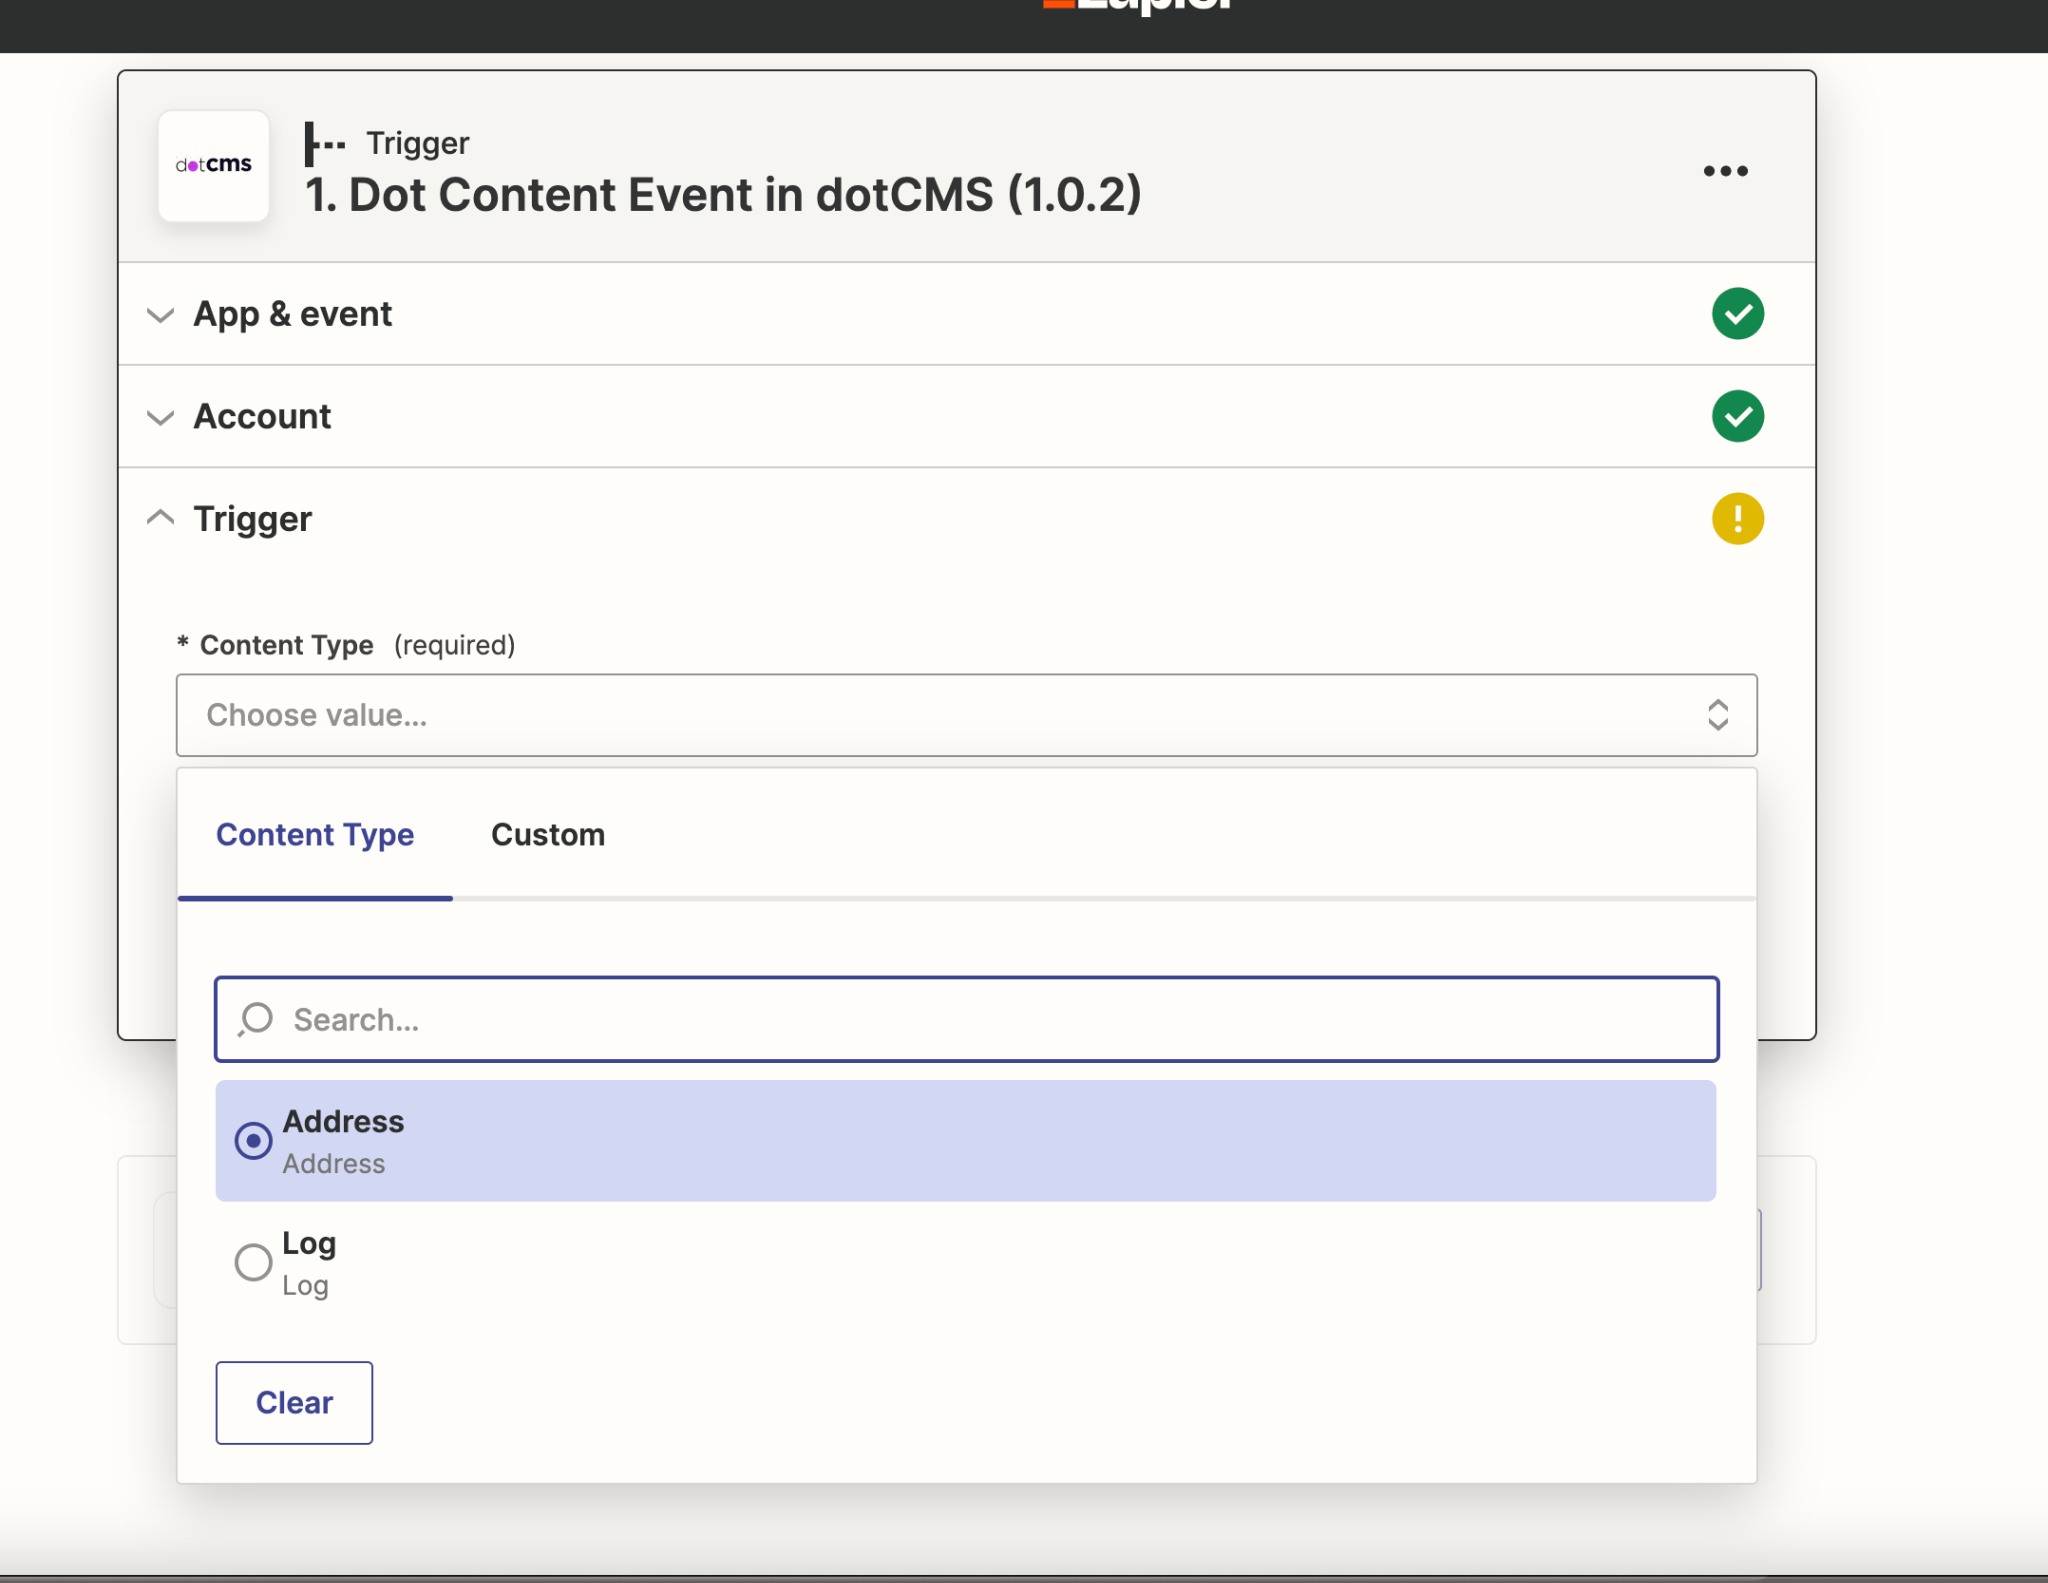
Here we'll select Log. The contentlets you created earlier should be detected by Zapier at this time.
We've created the base trigger; now, we'll build the action — that is, what will happen once the trigger is activated.
Select Google Sheets from the action list. We'll assign the event of “Create Spreadsheet Row” and continue on to the next step, where you'll be prompted to synchronize your Google account.
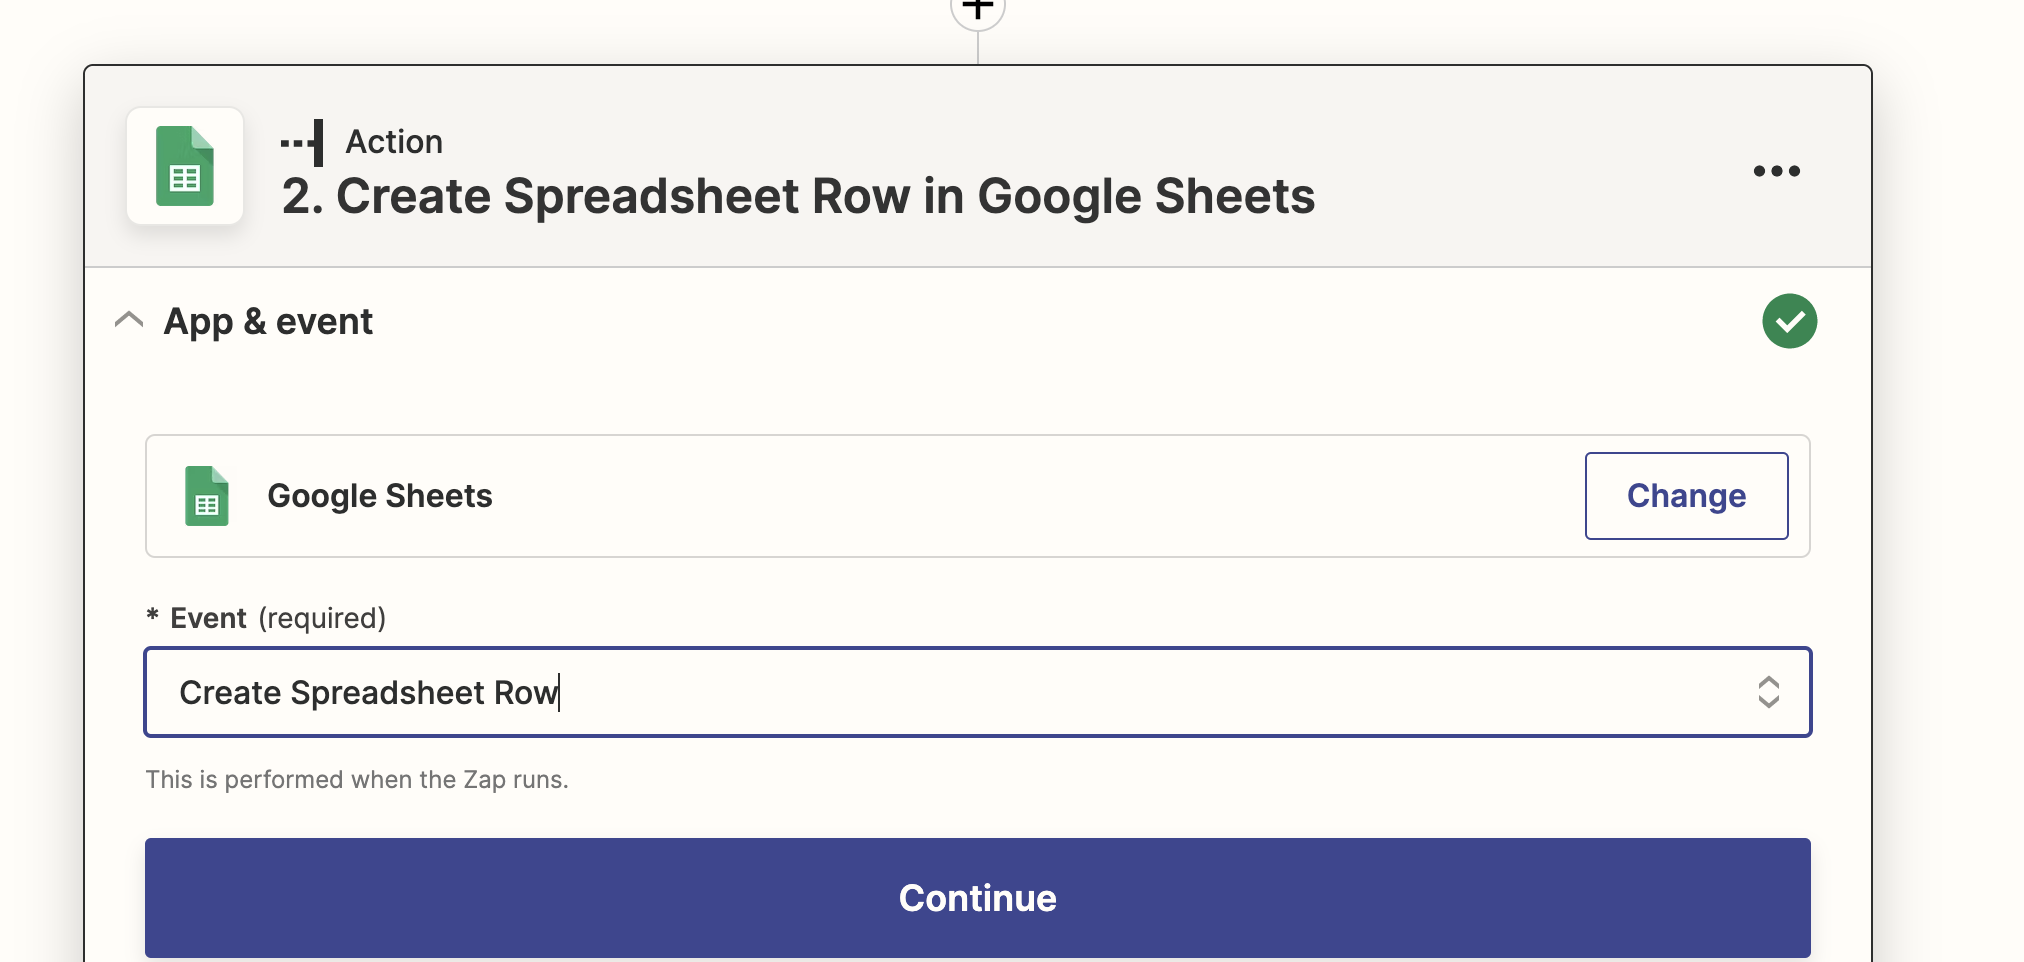
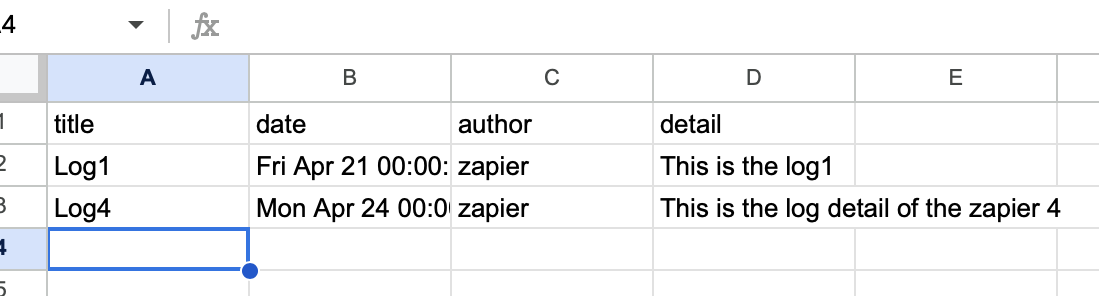
Before we continue, open up a new Google Sheet in the account you've connected, and set a few values into the header row to represent the Log fields: title, date, author, detail.

When you return to Zapier, you should be able to browse to the sheet you just created, and begin mapping fields to columns. Simply select the appropriate field for each column, using the dummy content loaded in the previous step, and continue.
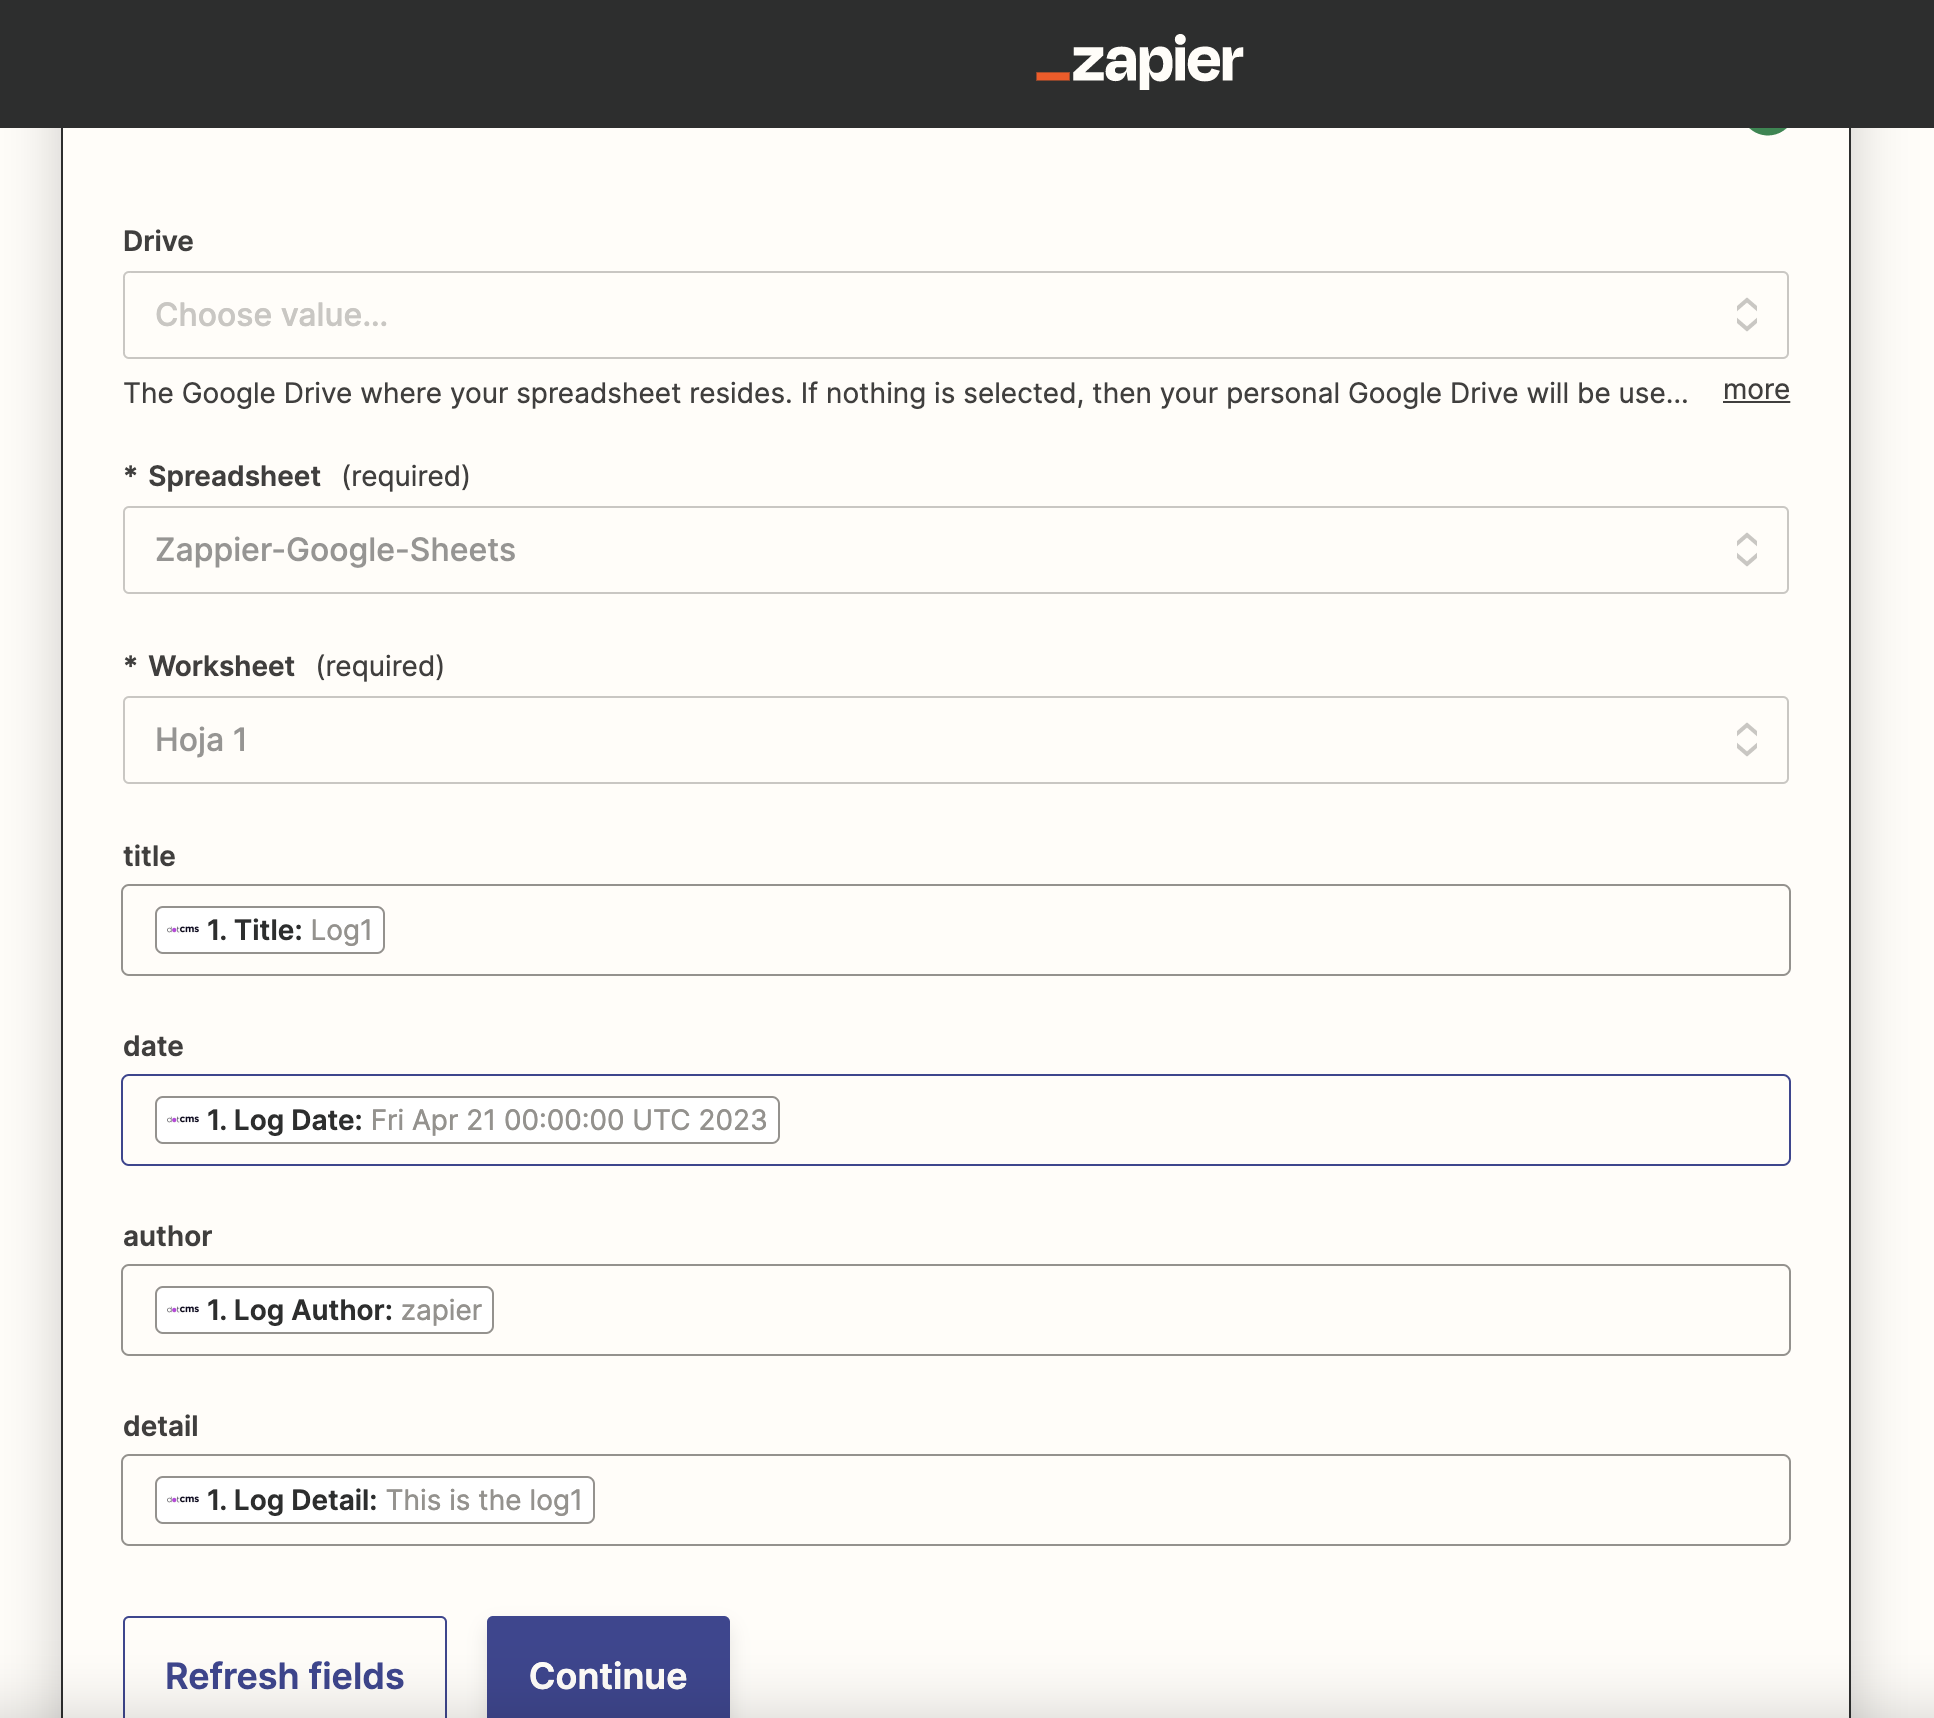
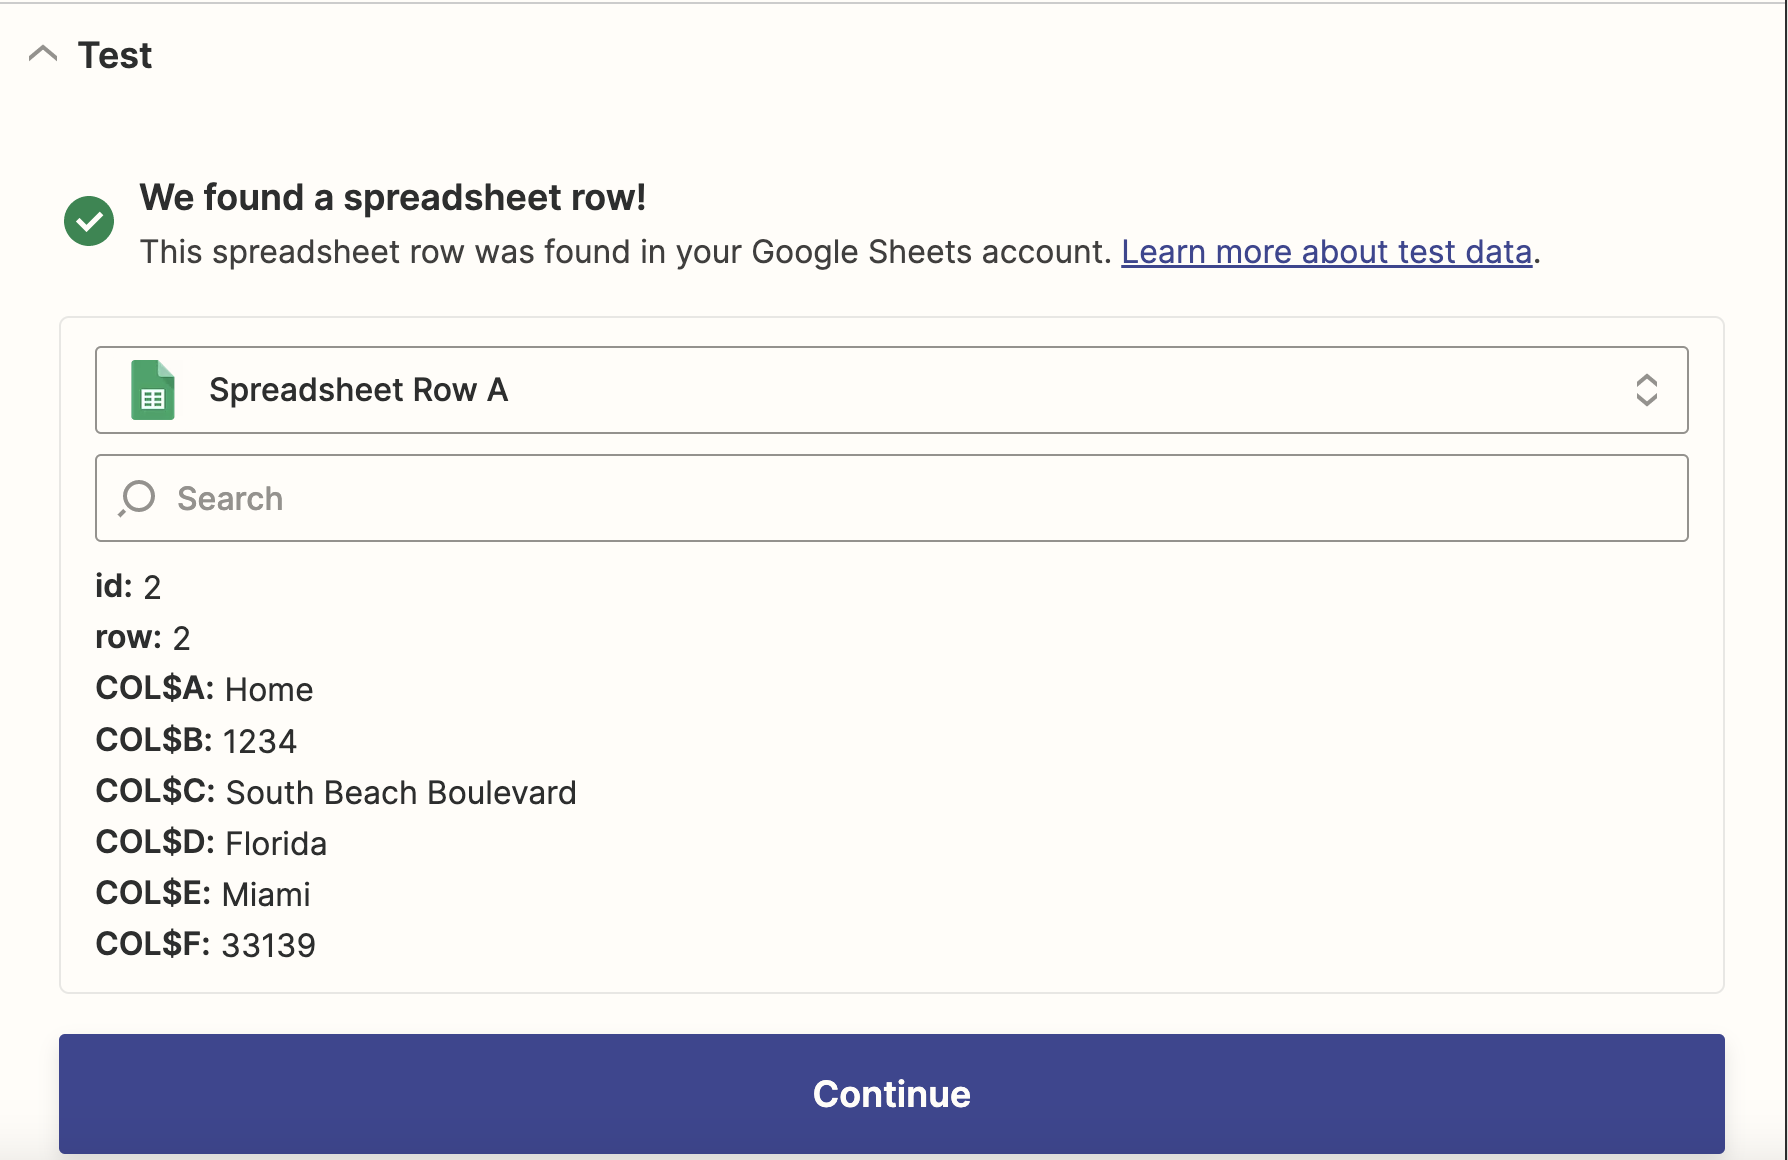
Finally, you'll have the chance to perform a test, sending the loaded data to the spreadsheet, which will receive a new row in real time.
Publish the Zap, and ensure it's switched on.
Testing From dotCMS
Back in dotCMS, if you return to the dotZapier App, you'll notice that it now displays a webhook URL. This row has been added by Zapier, and represents the registration of the Zap we created in our dotcms instance; its key is the Content Type variable we selected, plus the keyword webhookurl; its value is the zapier webhook that resulted.
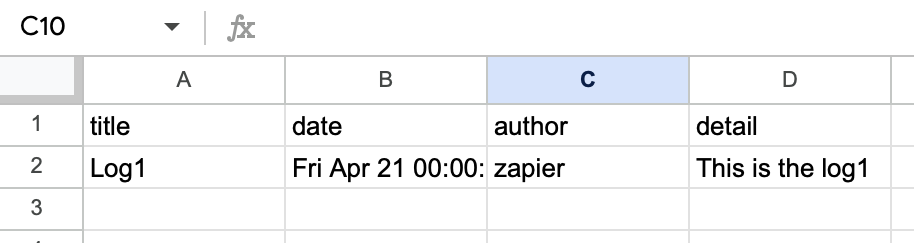
This means all the proverbial ducks are in a row. Let's perform a live test:
- Open up one of the contentlets of the selected type and Publish it.
- Now, check the Google Sheet.
In seconds, you should see a new row appear.
Now in the Other Direction!
We've successfully published from dotCMS to a Google Sheet. Now, let's try the reverse case: Creating a new row in a Google Sheet that will, cause a new contentlet of the chosen type to be created in dotCMS. This requires creating a second Zap; the steps are very similar to the last one, but with the trigger and actions effectively swapped.
Before continuing, make a second worksheet within your test document (or create another document entirely) to correspond to the new Zap. This will prevent a looping condition that can result if the two Zaps are working off the same set of rows. This time, make the first row into a series of column headings corresponding to the Address content type: title, address1, etc.
Be sure to add one more row beneath that with dummy data, as this will make testing easier.

Create a new Zap, and select Google Sheets as your app, with New Spreadsheet Row as the event.
Once again link your account, and now specify the newly created worksheet or document as the trigger. Zapier should be able to read the test row you created as a sample, when you test the connection.
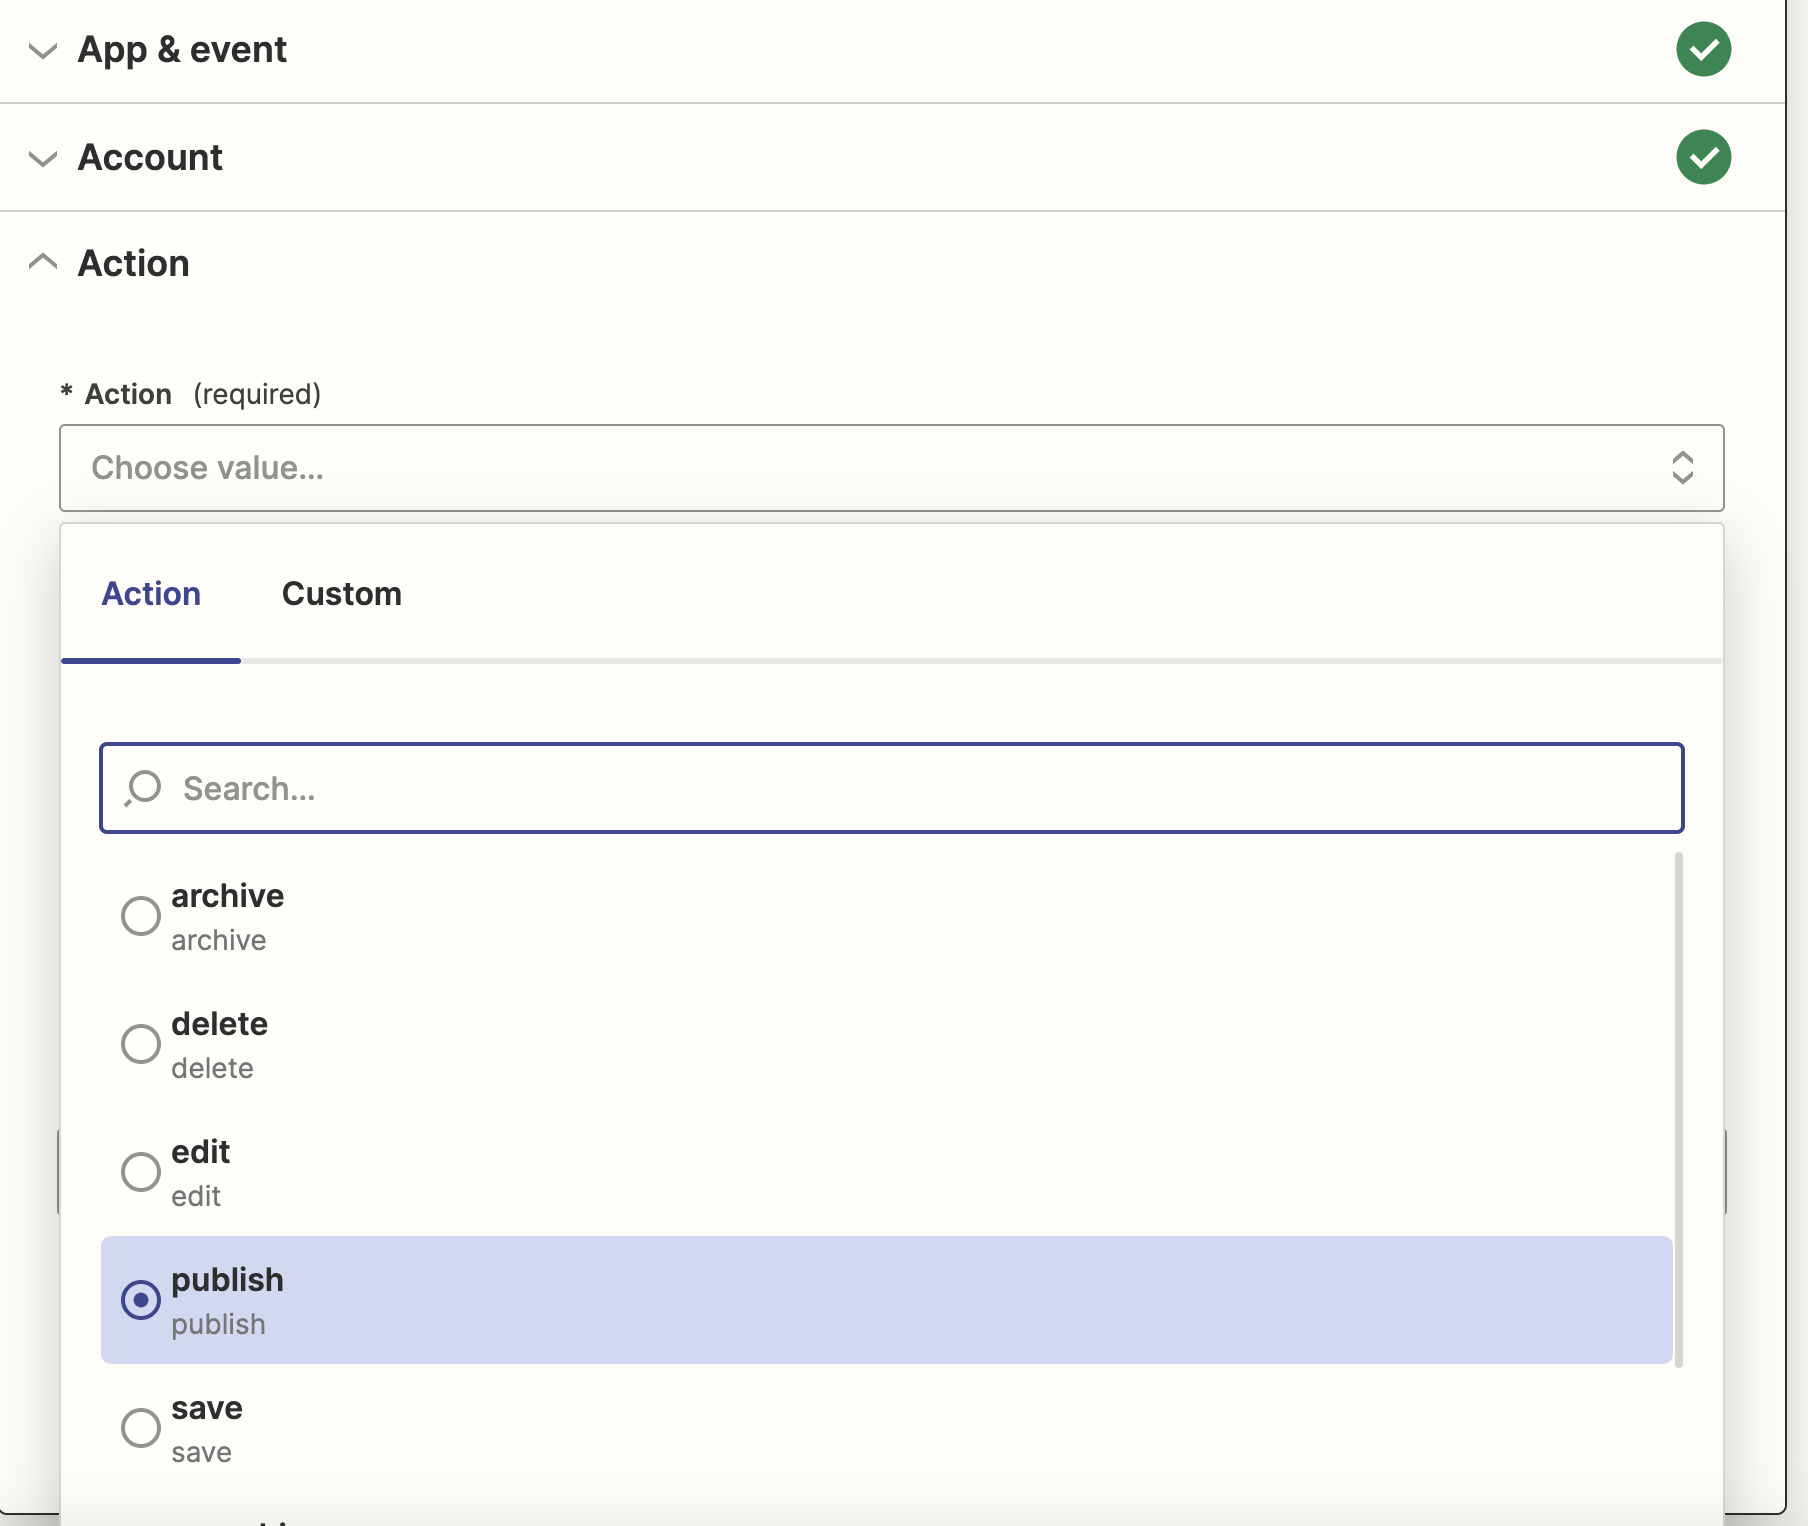
Next, create the Action. This time, you'll select dotCMS as the app. For the time being, there's only one event — Send to dotCMS — so, select that.
You'll need to link the accounts in the now-familiar way.
For the action, you can select a dotCMS Workflow Action to specify when a new spreadsheet row is detected. We'll pick Publish.
Next, select the Content Type to map, and map the fields as you did earlier.
Continue, and you will see a prompt to send a test payload. Test it, and return to dotCMS to find you've created a new contentlet based on the supplied data.
Finally, you can now manually create a new row in the second Google Sheet, and this data will be transmitted to dotCMS as a newly published contentlet.

Please note that this process may take a few minutes, for debounce purposes; you may not see the result on dotCMS as soon as you finish typing the row. Just give it a few minutes, and voila: You'll find a brand new contentlet — or several, if you made a few rows — visible in the dotCMS Content Search pane.
Special Note: JSON Workarounds
There are certain cases where you may wish to send raw JSON as a pure string to another app via Zapier — such as a dotCMS Block Editor field. Zapier's eager JSON parsing may interfere with this when transmitting via the workflow actionlet, and therefore a small workaround may become necessary. Below are two examples that have been found to be effective.
Take care to be as specific as possible, so to only adjust the affected fields.
Example 1: Google Sheets
A simple way to deliver a JSON string to a Google Sheet, or other spreadsheet, is to add a ' to the beginning of the JSON string.
This can be configured from the Send to Zapier Workflow Sub-Action. For example, if you're attempting to send a Block Editor field with the variable name body to a spreadsheet, add the following line of code to the Post-Script Code field:
$content.setProperty('body', "'${content.body}")
The string should now display properly in the target spreadsheet.
Alternately, you could add ' to the beginning of all fields, to ensure consistent string treatment, through the Field Value Customization field, with the following code:
$dotJSON.put('fieldValue', "'$fieldValue")
Example 2: Other Cases
A more general workaround for sending JSON strings, which can apply to all manner of target applications, is to leave off the closing } character, and then configure the Zap to add it back on automatically.
Once again assuming the case of a Block Editor field with the variable name body, add the following code to the Post-Script Code field of the actionlet:
#set($len = ${contentlet.body.length()} - 1)
$contentlet.setProperty('body', ${contentlet.body.substring(0, $len)})
This will send the whole JSON string, except the final closing brace.
Now, edit the Zap that receives the relevant field from dotCMS. Browse to the field mapping, and add the missing } character immediately after the variable.

Now your target should receive the complete JSON string.