The License Manager displays the license status and details of your dotCMS instance, and allows you to install and apply licenses, or request a trial license.
To open the License Manager, select System -> Configuration and click the Licensing tab.
To add a new license, the recommended method is to upload a license pack:
License Editions
Community Edition
For dotCMS Community Edition, no license is required. However if you are interested in unlocking the full dotCMS feature set, you may wish to request a trial license.
Enterprise Edition
If you are a dotCMS Enterprise customer, you may add a license and manage your licenses from the License Manager screen.
Adding Licenses
At the top of the License Manager screen, you can request a trial license or add a dotCMS Enterprise license.
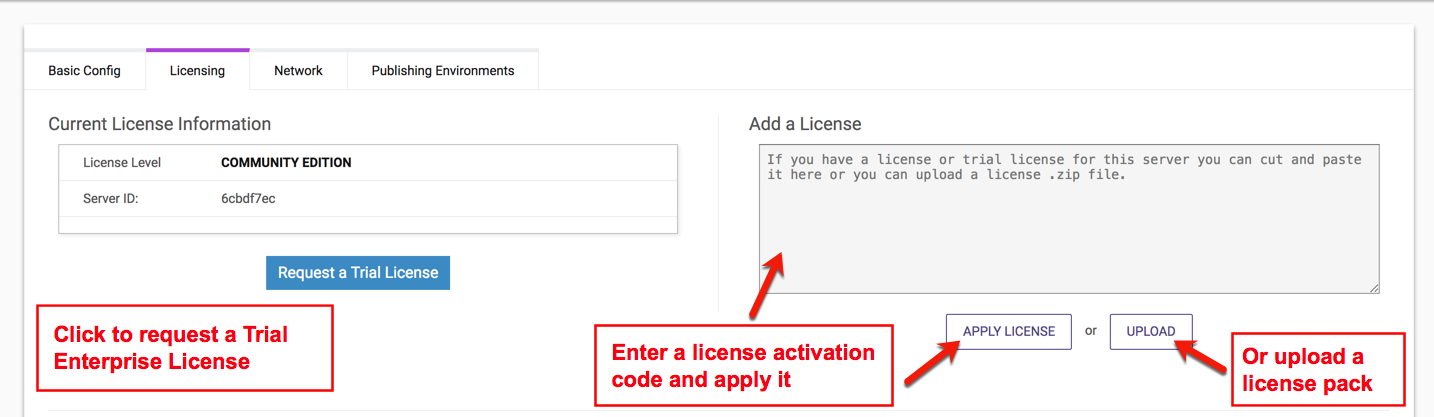
Request a Trial License
If you are not currently a dotCMS Enterprise client, you may request a trial license from the License Manager. To request a trial license:
- Open the License Manager.
- Press the Request a Trial License button.
- A form will open on the dotCMS web site. Fill out and submit the form to request a trial license.
- After your request is received, a license key will be sent to you via email.
- After your request is received, a license key will be sent to you via email.
- Copy the license key from the email link and paste it into the Add a License field in the License Manager*.
- Press the Apply License button.
Add an Enterprise License
Enterprise customers may apply a license activation code (which is applied to a single dotCMS server) or a license pack. The licenses available to you are specified in your dotCMS Enterprise contract; contact dotCMS Support to request a license for your server.
Single Server License Codes
To add a license activation code for a single server:
- Open the Licensing screen (System -> Configuration -> Licensing).
- Copy the license activation key provided to you by dotCMS.
- Paste key into the Add a License field.
- Click the Apply License button.
License Packs
You may obtain a license pack by requesting one through the dotCMS Support portal.
To add a license pack:
- Open the Licensing screen (System -> Configuration -> Licensing).
- Click the Upload button in the Add a License section.
- In the Upload Licenses popup, click the Choose File button.
- In the file selection popup, select the license pack provided to you by dotCMS.
- In the Upload Licenses popup, click the Upload button.
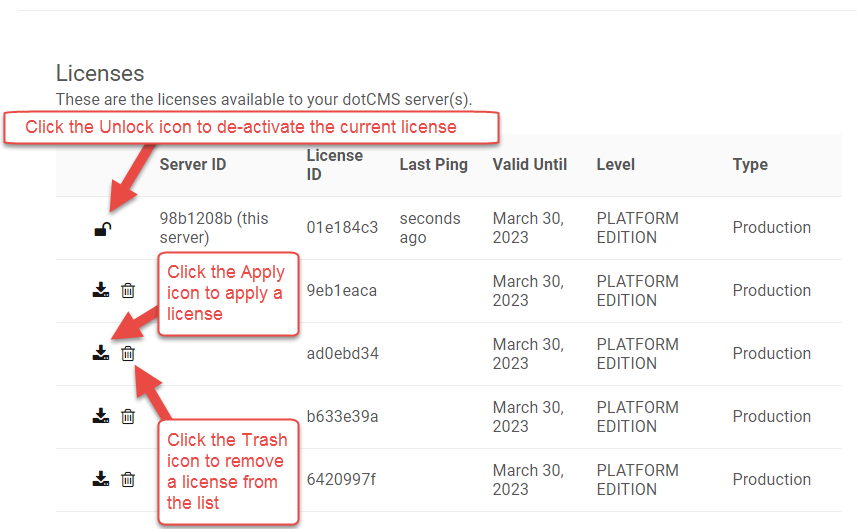
Available Licenses
A list of all licenses available for your server are displayed in the Licenses area at the bottom of the Licensing screen. This list includes all licenses applied to the server from all sources (including individual license codes and license packs).
Note: When you first start your server, there will be no available licenses displayed. You must first add a license or license pack before you can view and apply licenses on your server.
- To de-activate the current license, click the Unlock icon next to the license displayed at the top of the list.
- To apply a new or different license your server, select one of the available licenses from the list.
- To add licenses to the list, you may either paste in a license code or upload a license pack.
- To remove a license from the list, click the Trash icon on the left side of the license line.
- When you attempt to remove a license, a warning displays prompting you to confirm.
- When you confirm the license removal, the selected license is removed, and the server resets to dotCMS Community Edition.
Applying a New License
You may apply any available license displayed in the Licenses section of the screen.
Simply click the Apply icon (
Note: When you apply a valid license activation code or upload a valid license pack to a server which does not yet have a valid license available, dotCMS will automatically apply a license to the server.
- If you applied a license activation code, the license will automatically be applied.
- If you uploaded a license pack, the server will automatically apply the first available license from the license pack.
Licensing a Cluster
When you license a cluster in dotCMS, each server in the cluster may allocate licenses from the licenses available to it (just as with a stand-alone server), and all servers in the cluster may share the same license pack, automatically allocating the licenses available in the pack among all the servers.
In most cases, the license pack is a simple affair:
- Each cluster gets one license pack, and
- each pack includes a number of licenses equal to the number of nodes in the cluster.
When licensing servers in a cluster, it's important that the licenses be applied to the servers in the correct order, to ensure two servers don't attempt to allocate the same license from the license pack. How you start up the servers in the cluster depends on whether you choose to upload the license pack directly to the assets folder on the server, or to upload the license pack in the dotCMS back-end. Use the following steps to start up and license a cluster properly.
Option 1: Upload the License Pack File to the Server File System
1. Upload the license pack (license.zip file) into the assets folder.
Since all servers in the cluster share the same asset folder, this file will be available to all servers in the cluster.
2. Start one server in the cluster (only).
Start up the first server in the cluster. The first server will automatically do all of the following:
- Find an open the license.zip file in the assets folder.
- Load the licenses in the database.
- Apply one license from the file to itself.
- Rename the file (so other servers in the cluster don't try to load the same licenses again).
3. Start up each of the other servers in the cluster.
Each properly configured server will automatically find the first server and apply a license from the license pack.
Option 2: Upload the License Pack Through the Back-end UI
1. Upload the license pack to the first server in the cluster.
Start by following the license pack method, as displayed in the animation.
Important: Do not upload the license pack to more than one server. After the license pack is uploaded, additional servers in the cluster will automatically find the license pack on the first server and apply a license from the license pack.
On the (just started) first server in the cluster, dotCMS will automatically allocate and apply a license from the license pack.
2. Start up each of the other servers in the cluster.
Each properly configured server will automatically find the first server and apply a license from the license pack.
Important: Cluster Server Requirements
When you start up a new server in a cluster, it will automatically find the license pack on the first server, and will automatically apply a license from the license pack, only as long as all of the following requirements are met:
- Each server's context.xml file (/dotserver/tomcat-X.x/webapps/ROOT/META-INF/context.xml) must be configured to share the same database with the first server.
- Each server must share the same assets directory (/dotserver/tomcat-X.x/webapps/ROOT/assets) with the first server, using a symbolic link.
- If multiple servers in the cluster are on the same physical server, then each server must be configured to use a different tomcat port and shutdown port in the server.xml file (/dotserver/tomcat-X.x/conf/server.xml).
Upon startup, each server configured this way will understand that it is part of a cluster, and:
- Automatically take the next available license from the license pack that was uploaded to the first server.
- Configure itself as part of the cluster.
- Start dotCMS.
No other configurations are necessary when using auto-clustering with valid license packs.
License File Location
Licenses are stored in one of two locations in the dotCMS distribution:
- A dotsecure/license folder (for server licenses which were uploaded through the dotCMS back-end).
- An assets/license.zip file (for license packs directly uploaded to the server).
When upgrading or moving a server, it is important that you copy all license files in the dotsecure folder or copy the license.zip file in the assets folder.
- If you do not copy the license files, any previously applied licenses will no longer be valid, and you will have to apply for a new dotCMS license.
- The actual location of the server ID file is determined by the DYNAMIC_CONTENT_PATH` property in the dotmarketing-config.properties file.
- For more information on this property, please see the Dynamic Content Path documentation.