In the old days, when we talked about creating a search tool for a website, the idea was simple: give people as many filters as possible to refine their search.
For example, on a recipe site, the search page might look like this:

It was pretty effective—you could search by recipe name (checking if your input matched part of the title), filter by ingredients, and even pick categories like “Breakfast.” So, if today you wanted spaghetti with mushroom sauce for lunch, you’d just set the filters like this:
Name: Spaghetti
Ingredients: Mushrooms
Meal type: Lunch
And voilà, you’d get a list of recipes that matched.
But the truth is, this type of search feels a little outdated now—maybe “caveman style.” Today, we want something more natural. Imagine instead of clicking through filters, you could just type:
“I want Italian food with mushrooms for lunch.”
The system would understand what you mean and return not only spaghetti, but also other Italian dishes you might enjoy—maybe even something better than what you had in mind.
And this is exactly what we call an AI-Powered Search: think of it as a robot that speaks your language, understands your request, and searches through a neatly organized “rack” of information to instantly find what you need.
In this post, we’ll build one of those AI-powered search bots using dotCMS and OpenAI.
The Robot’s Workshop: Introducing the Demo Site
First things first: before we can start working with our robot, we need to set up the demo site. For this post, the demo will be a recipe site where users can store and search for recipes. Let’s build it step by step.
Recipe Content Type
After creating a new site (you can name it however you like), we’ll create a new Content Type called Recipe.

If you need a refresher on how to create a Content Type, check the docs here.
Adding Fields to the Recipe Content Type
We’ll add four fields:
Title – The recipe name. Type: Text. Must be required and unique.
Ingredients – A list of ingredients. Type: TextArea.
Preparations – The preparation steps. Type: TextArea.
Description – Additional details like the country of origin or category (Breakfast, Lunch, Dessert, etc.). Type: TextArea.
At this point, our Content Type looks like this:

Importing Sample Recipes
Now let’s import a file containing more than 40 sample recipes we’ll use for testing.
If you need instructions on importing content, check here.
Important mark them to be import and publish.

Creating the Search Widget
Next, we’ll create a new Widget that will contain our search code. This is what the widget will look like when finished:

It’s not the prettiest design—but hey, I never promised we’d build a handsome robot! The goal here is to keep things simple so we can focus on the AI part later.
To do this, create a new Widget Content Type. If you need guidance, check here.
Let’s name it AI-Powered Search.
By default, this type comes with 4 pre-created fields. We won’t need Widget Usage and Widget Pre-execute, so you can remove those. Your widget should now look like this:

Adding the Widget Code
In the Widget Code field, paste the following:
<style>

    .search-bar {

        margin-bottom: 20px;

    }

    .recipes {

        display: flex;

        gap: 20px;

    }

    .recipe-card {

        border: 1px solid #ccc;

        border-radius: 8px;

        padding: 15px;

        width: 250px;

    }

    .recipe-card h3 {

        margin-top: 0;

    }

    button {

        margin-top: 10px;

        padding: 8px 12px;

        cursor: pointer;

    }

    #searchInput {

        width: 500px;

        height: 30px;

    }

</style>


<!-- First Row: Search -->

<div class="search-bar">

    <input type="text" id="searchInput" placeholder="Search recipes...">

    <button onclick="searchRecipes()">Search</button>

</div>


<!-- Second Row: Recipe Cards -->

<div class="recipes" id="recipes">

</div>


<script>

    async function searchRecipes() {

        const recipesContainer = document.getElementById('recipes');

        recipesContainer.innerHTML = 'Loading recipes…';


    }

</script>
At this stage, our widget looks like this:

And when you type something in the search box and click the Search button, the widget will respond.

Powering Up the Circuits: dotCMS AI Configuration
The first thing our robot needs is energy—in this case, an OpenAI key.
We’ll use OpenAI as our AI API.
Get your OpenAI key.
In dotCMS, go to the Apps Portlet and select the dotAI App.

Choose the System Host (or the Host you created earlier).
Enter your OpenAI key in the API Key field.

In the “Embeddings Model Names” section, you can enter any model available for embeddings. By default, we use text-embedding-ada-002, but you’re free to choose any other embedding model—just make sure it’s specifically an embedding model.

Click Save.
Now our robot has power!
Building the Robot’s Rack: Creating the Index
Remember the “rack” we mentioned? This is where the robot neatly organizes all recipes so it can find them faster. To create it, we’ll build an Embedding Index.
Go to the dotAI Portlet.

Note: If you don’t see the dotAI Portlet, it may be because you need to add it. For more details on how to add a tool to the menu, check here.
Open the Manage Embeddings/Indexes tab.

Enter Recipe Index as the Name.
For Content to Index by Query, use the Lucene query: +contentType:recipe
This will select all the live recipe contentlets. (Make sure your recipes are published!)
Tip: You can use any Lucene query here to filter by content type, apply conditions, or combine data from different content types. Learn more about Lucene queries here.Click Build Index.
You’ll see a message like:

That means 45 recipes have been selected and organized into the rack.
After a few seconds, you’ll see the index is ready.

Now the rack is in place, and the robot is fully powered up. Next step: give it instructions!
The Robot’s Ears: Listening for Search Requests
The API endpoint is like the robot’s ears—it’s how it listens to what we’re asking. Let’s see exactly how it works.
This is a GET endpoint with the URL:
/api/v1/ai/search
To use it, we pass two query parameters:
query → the prompt (what we’re asking the robot)
indexName → the index we want to search in
For example, if we send this request:
GET http://localhost:8082/api/v1/ai/search?indexName=Recipe Index&query=I would like an Italian recipe
The robot will look for Italian dishes in the Recipe Index.
To test it you can open your favorite browser and hit the http://localhost:8082/api/v1/ai/search?indexName=Recipe Index&query=I would like an Italian recipe URL.

The %20 characters are added automatically by your browser.
How the Results Work
It’s important to note: the query is not a filter. Instead, it’s treated like a semantic suggestion. The robot tries to understand the meaning of our request, then compares how close or far each recipe is to that meaning.
If we send the request above, we get all 45 recipes, ordered from the closest match to the furthest.
The first two results:
Risotto → distance: 0.1714
Spaghetti Carbonara → distance: 0.1807
The last two results:
Kimchi → distance: 0.2573
Pancakes → distance: 0.2559
As you can see, Kimchi and Pancakes aren’t Italian at all, but they still appear because the robot ranks everything by distance.
Using Thresholds
If we don’t want unrelated results (like Kimchi when asking for Italian food), we can use the threshold parameter.
For example, setting threshold=0.2 means we only get recipes with a distance less than 0.2.
Now the results are:
Risotto → 0.1714
Spaghetti Carbonara → 0.1807
Ratatouille → 0.1877
Ratatouille is technically French, but it’s still closer to “Italian food” than Kimchi or Pancakes. Looks like we need more Italian recipes in our dataset!
Limiting Results
Finally, if we just want a specific number of results, no matter their distance, we can use the searchLimit parameter (later we are going to see it in action in our example).
For example, searchLimit=3 will always return the 3 closest matches to the query.
Later, we’ll see how this parameter becomes very useful in our AI-Powered Search.
Post version for very large query
Sometimes your query or prompt might be too long to comfortably send in the URL. For those cases, we also have a POST endpoint, which is very handy.
Instead of passing everything as query parameters, we send the request body as JSON. For example, the previous request in POST form would look like this:
{

  "indexName": "Recipe Index",

  "threshold": 0.2,

  "prompt":"I would like a Italian recipe"

}
AI-Powered Search
Let’s update our widget to hit the Endpoint, go back to Content Types and open the AI-Powered Search Widget. Open the Widget Code attribute and replace just the section between the <script> tags with the follow code:
<script>

    /**

     * Main entry function to search recipes.

     * - Displays a loading message while waiting for server response.

     * - Calls the API to fetch recipes based on user input.

     * - Renders the recipes in the page.

     */

    async function searchRecipes() {

        // Get the container where recipes will be shown

        const recipesContainer = document.getElementById('recipes');


        // Show a temporary "loading" message

        recipesContainer.innerHTML = 'Loading recipes…';


        // Send the request to the backend and wait for recipes

        const recipes = await sendRequest();


        // Display the recipes on the page

        showRecipes(recipes);

    }


    /**

     * Sends a GET request to the backend AI search endpoint.

     * - Builds a URL with query params: the search input and max number of results.

     * - Fetches data from the API.

     * - Returns only the dotCMSResults array from the JSON response.

     *

     * @returns {Promise<Array>} List of recipes

     */

    async function sendRequest(){

        // Create a URL pointing to the API endpoint

        const url = new URL('/api/v1/ai/search', window.location.origin);


        // Add query params: user input and result limit

        url.searchParams.set('query', searchInput.value);  // searchInput is assumed to be an <input> field

        url.searchParams.set('indexName', 'Recipe Index');  //If we don't set indexName it is default

        url.searchParams.set('searchLimit', 3);            // limit results to 3 recipes


        // Call the API using fetch

        const res = await fetch(url.toString(), { method: 'GET' });


        // Handle errors: if server response is not OK (status >= 400)

        if (!res.ok) {

            throw new ErrorServer returned ${res.status});

        }


        // Parse JSON response

        const data = await res.json();


        // Return only the recipes list from response

        return data.dotCMSResults;

    }


    /**

     * Renders a list of recipes in the page.

     * - Clears the container first.

     * - Creates a card for each recipe with title, ingredients, preparations, and description.

     *

     * @param {Array} recipes - List of recipe objects to display

     */

    function showRecipes(recipes){

        // Get the container (make sure it's available globally here)

        const recipesContainer = document.getElementById('recipes');


        // Clear previous results

        recipesContainer.innerHTML = '';


        // Loop through recipes and build UI

        for (const recipe of recipes) {

            // Create a card container for each recipe

            const card = document.createElement('div');

            card.className = 'recipe-card'; // CSS class for styling


            // Add recipe title

            card.innerHTML = <h3>${recipe.title}</h3>;


            // Add ingredients

            card.innerHTML += `

                <p><strong>Ingredients:</strong> ${recipe.ingredients}</p>

            `;


            // Add preparation steps

            card.innerHTML += `

                <p><strong>Preparation:</strong> ${recipe.preparations}</p>

            `;


            // Add description

            card.innerHTML += `

                <p><strong>Description:</strong> ${recipe.description}</p>`;


            // Append the card into the container

            recipesContainer.appendChild(card);

        }

    }

</script>
As you can see, we are calling the endpoint with the searchLimit parameter to return only 3 results. The query parameter is filled with whatever you type in the input field.
Power On: Testing the Robot’s Search Skills
We’re almost done—just one last step to get our Robot fully set up and ready to work.
1. Create a Page
Let’s start by creating a new page. Call it “Search Recipes.”

2. Add the Widget
On this page, add a Widget:
When the Page Editor comes up, click the + button to add the Widget.
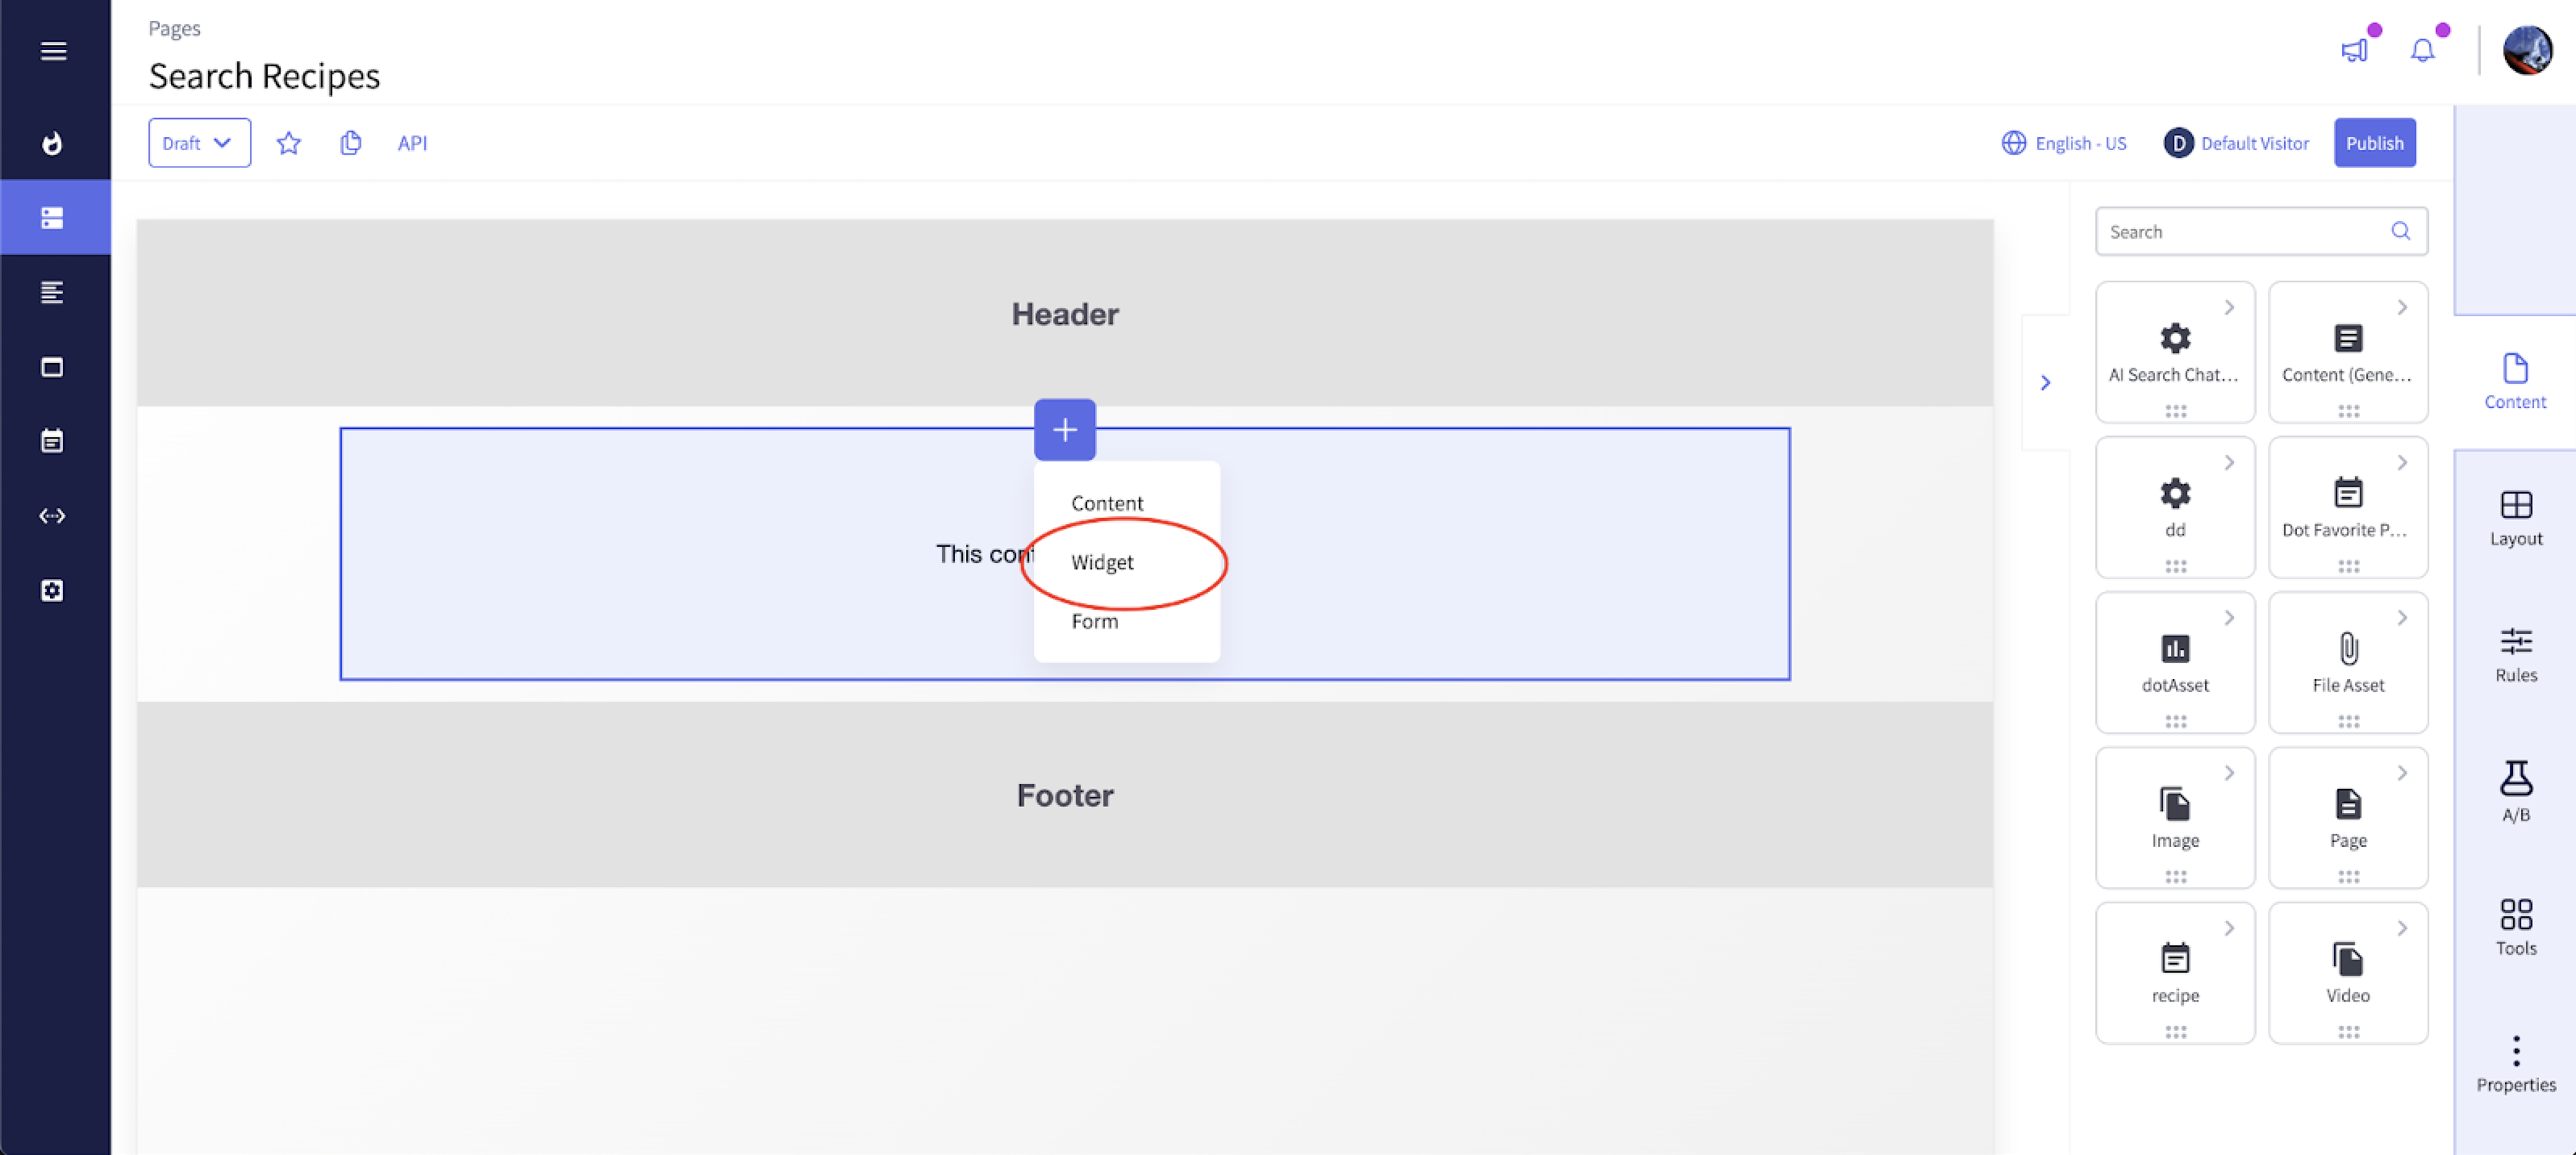
Select “AI-Powered Search.”

Set the Widget title to “Recipes Searcher.”

Click Save.

3. Publish the Page
Now publish the page.
At this point, our Robot is set and ready to go. Time to test it!
Open a new browser tab and go to:
http://[Your dotCMS Domain]/search-recipes
Try typing “I want a good Italian recipe” in the search input, then click the search button.
You’ll get results like this:

Now let’s try another example. Enter: “How can I prepare Arepas?”

Looks like it’s working, right?
Remember, the query (or prompt) is not a strict filter. It’s more like a semantic suggestion. The AI compares the meaning of your request with the recipes and shows those that are closest in meaning.
But here’s the question: which fields are used for this comparison? Is it all the fields, or just a specific set? And more importantly—can we choose which fields to include in the comparison?
More Labels on the Rack: Improving Search with Extra Parameters
Let’s analyze the response we got in our last example in more detail. This means checking the full JSON response returned by the endpoint. If we hit:
GET
http://[Your dotCMS Domain]/api/v1/ai/search?query=How can I prepare Arepas&indexName=Recipe Index
We get something like this:
{

  "timeToEmbeddings": "24ms",

  "total": 3,

  "query": "How can I prepare Arepas",

  "threshold": 0.5, //Default value

  "dotCMSResults": [

  {

    "description": "Venezuelan/Colombian, Breakfast/Lunch",

    "title": "Arepas",

    "preparations": "Form dough, grill until golden, fill with cheese.",

    "ingredients": "Cornmeal, water, cheese, butter",

    ...     //Other COntentlet metadata attributes

    "matches": [

      {

        "distance": 0.18574455380439758

,

        "extractedText": "Cornmeal, water, cheese, butter Form dough, grill until golden, fill with cheese. Venezuelan/Colombian, Breakfast/Lunch"

       }

    ]

  },

  {

    "description": "Latin American/Spanish, Snack/Lunch",

    "title": "Empanadas",

    "preparations": "Stuff dough with filling, bake or fry.",

    "ingredients": "Flour, beef, onion, spices",

    ...     //Other Contentlet metadata attributes

    "matches": [

      {

        "distance": 0.18574455380439758,

        "extractedText": "Flour, beef, onion, spices Stuff dough with filling, bake or fry. Latin American/Spanish, Snack/Lunch"

      }

    ]

 },

 {

   "description": "Indian, Snack/Appetizer",

   "title": "Samosa",

   "ingredients": "Flour, potato, peas, spices",

   "preparations": "Fill pastry with spiced filling, deep-fry."

   ...     //Other COntentlet metadata attributes

   "matches": [

     {

       "distance": 0.20518222451210022,

        "extractedText": "Flour, potato, peas, spices Fill pastry with spiced filling, deep-fry. Indian, Snack/Appetizer"

     }

    ]

 }

}
Focusing on the matches Attribute
The matches section tells us two key things:
The distance value → how close this item is to our query.
The extractedText → the exact text used to calculate that similarity.
For the Arepas recipe, the extractedText is:
"Cornmeal, water, cheese, butter Form dough, grill until golden, fill with cheese. Venezuelan/Colombian, Breakfast/Lunch"
This text is a concatenation of three fields:
ingredients
preparations
description
Why Not the Title?
You might notice that the title (Arepas) wasn’t included. That’s because:
By default, if we don’t specify any fields for embedding, dotCMS automatically chooses fields.
It prefers TextArea fields and concatenates them in the order they appear in the Content Type.
In our case: ingredients, then preparations, then description.
The title is a Text field, so it was ignored.
But what if we do want the title included?
Customizing Fields in the Embedding Index
We can explicitly set which fields to include when building the AI Embedding Index.
Go to the dotAI Portlet → Manage Embeddings/Indexes tab.
Click the Advanced button.

In the “Or Field Variable(s)” input, list the fields you want:
title,ingredients,preparations,description
Delete the old “Recipe Index.”
Rebuild it with the same name (Recipe Index).
Results After Adding Title
Now, if we run the same request again:
GET
http://[Your dotCMS Domain]/api/v1/ai/search?query=How can I prepare Arepas&indexName=Recipe Index
The response for the Arepas looks like this:
"matches": [

  {

    "distance": 0.13691042363643646,

    "extractedText": "Arepas Cornmeal, water, cheese, butter Form dough, grill until golden, fill with cheese. Venezuelan/Colombian, Breakfast/Lunch"

  }

]
Notice two improvements:
The extractedText now starts with the title (Arepas).
The distance is closer (0.13 compared to 0.18 before).
Even the recipes returning changed:

Churros now in the third item are closer to Arepas than Samosas for sure.
Using a Velocity Template for More Context
The Advanced section also offers another option: “Velocity Template to embed.”
This lets us build a custom text structure for embeddings. For example:
Name: $contentlet.title
Ingredients: $contentlet.ingredients
Preparations: $contentlet.preparations
Description: $contentlet.description
After deleting and rebuilding the index with this template, the response looks like:
"matches": [

  {

    "distance": 0.1155504584312439,

    "extractedText": "Name: Arepas Ingredients: Cornmeal, water, cheese, butter Preparations: Form dough, grill until golden, fill with cheese. Description: Venezuelan/Colombian, Breakfast/Lunch"

  }

]
Again, two key differences:
The extractedText now uses our custom format.
The distance got even closer (0.11 compared to 0.13).
This shows how powerful it can be to choose the right fields and structure when building your embedding index. By giving the robot more context, we help it order its “recipe rack” more intelligently.
No Recipe Left Behind: Auto-Updating the Robot’s Rack
Now let’s add another recipe. One of my favorites: Tiramisu
Title:Tiramisu
Ingredients
2 cups strong coffee (cooled)
2 tbsp coffee liqueur (optional)
16–18 ladyfingers
1 cup heavy cream
8 oz mascarpone cheese
1/3 cup sugar
Cocoa powder for dusting
Preparations
Whip cream + sugar until soft peaks, fold in mascarpone.
Dip ladyfingers quickly in coffee (with liqueur if using).
Layer half the cookies in a dish, spread half the cream.
Repeat with remaining cookies + cream.
Chill at least 4–6 hours.
Dust with cocoa before serving.
Description: Italian|dessert

Don’t forget to publish it!
Now let’s test another prompt:
Prompt: “I love Tiramisu”

Wait—where is the Tiramisu?
Let’s try something: delete the index, create it again, and test once more.

This shows us something important: the robot doesn’t update its rack automatically when new Contentlets are created. That’s not ideal, right? Let’s fix it.
In Settings, go to the dotAI App.
Select the System Host option (or the Host you’re using dotAI with—use the same one we set up earlier in this post).
Find the option Auto Index Content Config.
This feature lets you include the ContentTypes you want the system to track. That means whenever Content of this type is created, the index will be updated automatically. You can also configure this per index.
So, let’s type the follow input there:
{

    "Recipe Index": "recipe.title,recipe.ingredients,recipe.preparations,recipe.description"

}
Save your change.
As you can see we also can set the fields that we want to use to the semantic comparison.
Now let’s create another recipe: Panna Cotta
Title: Panna Cotta
Ingredients (4 servings)
2 cups heavy cream
1/2 cup sugar
1 tsp vanilla extract
2 tsp gelatin powder (or 2 sheets)
3 tbsp cold water
Fresh berries or fruit sauce (to serve)
Preparations
Sprinkle gelatin over cold water, let sit 5 min.
Heat cream + sugar in a saucepan until hot (not boiling).
Remove from heat, stir in gelatin and vanilla.
Pour into small cups or ramekins.
Chill 4+ hours until set.
Serve with berries or sauce.
Description: Italian|Dessert

Don’t forget to publish it!
Now let’s test it again…
Conclusion
With the AI Searching option in dotCMS, we can build truly advanced AI driven search experiences. What we’ve seen so far is just the tip of the iceberg—there’s so much more we can do. For example, we could recommend recipes to users based on their favorite dishes. But that deserves its own deep dive.
So stick around… we’ll be exploring all of this very soon!